HP Insight Management 7.3 Installation and Configuration Guide Abstract This guide provides the installation steps and requirements for installing and configuring Insight Management. This guide assumes that you have read the HP Insight Management Preinstallation Worksheet and have access to the HP Insight Management Getting Started Guide and HP Insight Management Support Matrix. This document is intended for anyone who is responsible for installing and configuring HP Insight Management.
© Copyright 2009, 2014 Hewlett-Packard Development Company, L.P. Legal Notices Confidential computer software. Valid license from HP required for possession, use or copying. Consistent with FAR 12.211 and 12.212, Commercial Computer Software, Computer Software Documentation, and Technical Data for Commercial Items are licensed to the U.S. Government under vendor's standard commercial license. The information contained herein is subject to change without notice.
Contents 1 Understanding the installation process...........................................................6 Insight Management installation process......................................................................................6 HP Insight Management product summary...................................................................................7 Assumptions.............................................................................................................................
3 Finishing the HP Insight Management installation..........................................44 Assumptions...........................................................................................................................44 Running the Insight Management Advisor..................................................................................44 Checking for software updates or modifying the scheduled task....................................................
Some menus do not appear in the toolbars.......................................................................72 After upgrade, virtual machine host registration completes successfully without discovering the vCenter server and without vCenter credentials.................................................................72 Uninstalling Insight Control virtual machine management....................................................73 VMMclient.jar, commons-cli-1.0.jar, or org.mortbay.jetty.
1 Understanding the installation process Insight Management installation process The Insight Management distribution media contains an installation wizard, the HP Insight Management Installer. The Installer deploys and configures HP Systems Insight Manager and all essential Insight Management or the infrastructure management software or both.
• Legal provides the end user license agreement (EULA) • Verify Checksum Runs and verifies the checksum of the files that are present in the source provided and displays the overall validity of the provided bits. HP Insight Management product summary For information about the Insight Management products you can install, see the HP Insight Management Getting Started Guide Assumptions This guide assumes that you have already: • Read the HP Insight Management 7.3 Installation and Upgrade Release Notes.
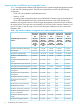
Approximate installation and upgrade times Table 1 lists approximate installation and upgrade times for individual Insight Management products on x86 and x64 operating systems.
Table 1 Approximate installation and upgrade times on Microsoft Windows Server (continued) Approximate Approximate Approximate installation upgrade time installation time (7.2 to 7.3) time Approximate upgrade time (7.2 to 7.
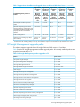
Table 2 HP Insight Management product upgrades to 7.3 (continued) Feature From version HP Insight Control licensing and reports 6.3 or later SPM adapter for EMC Symmetrix VMAX 7.1 or later 1 2 3 HP Insight Remote Support Advanced installer supports upgrade to version 5.80 from both 5.50 and 5.60 versions. Ensure that Insight Remote Support Advanced is upgraded to version 5.80 before installing HP Systems Insight Manager 7.3. If a version prior to 3.
2 Installing or upgrading HP Insight Management NOTE: When installing on a Japanese operating system, do not use Japanese characters in the user name, password, or installation path fields. Before beginning an installation or upgrade, consider the following: • Ensure that you have read the HP Insight Management Installation and Upgrade Release Notes available at: http://www.hp.com/go/insightmanagement/docs, to gather information on installation or upgrade issues.
Table 4 Log files and locations Service File Path MatrixIO hpio-controller.log C:\Program Files\HP\Matrix infrastructure orchestration\logs VMM hpvmmsvc.log C:\ProgramFiles\HP\Insight Control virtual machine management\log Matrix OE for HP-UX vselog.lsm.log, vselog.log C:\Program Files\HP\Virtual Server Environment\ logs SIM mxdomainmgr.
infrastructure orchestration Federated CMS is enabled by default during new installations, provided that the domain name server is prepared. In a federated CMS environment, forward DNS lookups resolve CMS hostnames to IP addresses. Additionally, on the primary CMS, forward and reverse DNS lookups must work for each secondary CMS. Verify that all DNS lookups can be resolved using the FQDN of each system. For more information, and for instructions on enabling a federated CMS environment after an upgrade to 7.
• Full name or domain (including the fully qualified domain name) • DNS entries corresponding to the hostname and domain If any of these attributes change after Insight Management has been installed and the CMS Reconfigure tool was not used, many features of the solution fails to function properly. For more information on how to use CMS Reconfigure tool, see the “CMS Reconfigure Tool” section in the HP Systems Insight Manager User Guide available from the HP SIM Library, located at http:// www.hp.
performance of Insight Management and its associated products. To obtain general test results, you can run Insight Management Advisor before you begin the installation, or you can run the Integrated Installer by selecting the required components and then proceed towards Check for prerequisites screen. 1. Click Run Insight Management Advisor. The Welcome to the HP Insight Management Advisor screen appears. Figure 2 Welcome to the HP Insight Management Advisor 2.
a. b. c. In the Filter results by severity section, include or exclude certain severity results by selecting or deselecting applicable severity options. Select or unselect All to select or deselect all severity options. In the Select tests to execute by product or component section, select the products to be included in the results or select or deselect All to include or exclude all products. Select or deselect Include Pre-Install Tests to include or exclude the pre-installation tests.
Figure 5 Items found that will affect the performance of the HP Insight Management NOTE: To sort Insight Management Advisor results: • Click on the Test column header to reorder the results by the test name. • Click the Result column header to reorder the results by severity. Table 5 (page 17) provides an explanation of the icons that appear in the Insight Management Advisor results screen. Table 5 Insight Management Advisor icon legend Icon 5.
www.hp.com/go/insightupdates. The installation instructions are available at http:// h18004.www1.hp.com/products/servers/management/unified/infolibrary_ic.html HP Insight Management supports HP Insight Control server provisioning. Insight Control server provisioning is an alternative to HP Insight Control server deployment with the ability to handle multi-server operating system provisioning to ProLiant and BladeSystem servers.
3. Do one of the following: • (Recommended) To install or upgrade the products selected on the screen, click Next. • (Optional) To select specific components of each software product you want to install or upgrade, click Customize. • To install or upgrade only Virtual Connect Enterprise Manager in standalone mode, clear all check boxes on the screen, and click Customize.
Step 5: Installing from HP Insight Management DVD #2 The HP Insight Management DVD #2 Selection screen appears when you are installing or upgrading products or components that reside on DVD #2. You can either use the same drive and replace disks as needed or you can specify an alternate drive. If you specify a network drive, you must temporarily set the Internet Explorer security level for the Trusted Sites zone (Tools→Internet Options→Security→Sites) to Low.
selected for installation or upgrade. For more information about prerequisites, see the HP Insight Management Support Matrix at http://www.hp.com/go/insightmanagement/docs. The prerequisites list on the screen includes server, services, database, and application requirements. To ensure that the hardware and software configurations on the target server meet the requirements for the products you want to install, run the Insight Management Advisor.
the software performance or behavior. However, the target location must meet the following requirements: • The target directory must be on a local hard disk drive. Some products might not install if the target directory is a mapped or a shared drive. • The target hard disk must have enough temporary space to complete the installation in addition to the space required for Insight Management products you plan to install.
Step 9: Entering service account credentials The Service account credentials screen allows you to provide the credentials Insight Management uses as the sign-in credentials for services it creates. Figure 10 Service account credentials Table 6 Service account credentials fields Field Description User name A valid user name with local administrative privileges. Password A valid password for the user name. Passwords must be only alphanumeric characters or []()<>_-!@$,.'*^%#&=`:|~;+\ and space.
1. 2. Enter the existing service account credentials for Insight Management. Click Next. Step 10: Configuring a database HP Insight Management searches for an existing database on the local system. If a local/remote database is detected, use this database or enter the credentials for a remote database. The option to create a new database is disabled when an existing database is detected.
Figure 11 Database configuration New installation 1. 2. 3. Select an option. Enter the appropriate user credentials. If you are using an existing database, provide the server and database information. Click Next. Upgrade If you previously used Microsoft SQL Express 2005 (SP3 or later), the database is upgraded to Microsoft SQL Express 2008 R2 SP2 as part of the HP SIM upgrade. This SQL Express upgrade is required to upgrade Insight Management. 1.
Figure 12 Automatic sign-in configuration (Optional) Enabling automatic sign-in after the installation reboot NOTE: When installing via Remote Desktop and using automatic sign-in to reboot to the original installation session, you must include the /admin or /console switch to reconnect remotely through the remote desktop after the system reboot.
Only Microsoft Proxy Server is tested and supported, and only basic authentication for Internet proxy servers is supported. The use of Internet proxy server scripts and full NTLM authentication are not supported. The Insight Management Update utility accesses the HP website and compares the version numbers of the installed software with the version numbers of the latest available software. If your environment requires proxy settings and they are not set, this task fails.
Step 13: Setting Product title configuration The Product title configuration (optional) screen enables you to customize the default product title displayed on the login screen. The product title configuration screen is displayed only when HP SIM is selected during installation. The values entered as part of the banner settings in the Product title configuration page are updated in the globalsettings.props file.
Table 7 Banner setting behavior (continued) Scenario Check box status Implementation User navigates to Next/Previous screen and navigates back to the banner screen Selected The data entered previously is retained in the text boxes. User navigates to Next/Previous screen and navigates back to banner screen Cleared The text box values are reset to the default values based on the components selected. Banner settings after installation Selected The values present in the text boxes are retained.
Procedure 1 To specify a non-default port: 1. 2. 3. Select Specify HTTPS port. Enter a port number in the HTTPS Port field. The standard port number is within the range 1 65535. Click Next. Step 17: Selecting the sub-range addresses for HP Virtual Connect Enterprise Manager In the VCEM Range Selection screen, you must select one of the 128 sub-range addresses for both MAC and WWN, only if you are planning to install multiple instances of CMS under the same administration.
Figure 17 VCEM—MAC and WWN range selection NOTE: If you do not want to provide the range information, you must not select the checkbox. If the checkbox is cleared, the drop-down list is no longer available, and theVCEM Defined range (128k addresses) label appears. If you do not select the option I (will) use multiple CMS, then after the DVD installation is complete, you can perform this step by manually configuring the exclusion ranges directly on VCEM page from HP SIM.
3. After the selection is complete, a pop-up window appears displaying a message similar to the following: Are you sure you want to use VCEM MAC subrange #70 and VCEM WWN subrange #128? This requires no other VCEM instance on the network using these same ranges. Figure 18 VCEM Range Selection screen Click OK to confirm or Cancel to abort and re-select the subrange values.
Figure 19 HP Matrix Operating Environment configuration management,capacity planning and workload management configuration 1. 2. To choose a different path, enter the path or click Browse and navigate to the desired storage location. Click Next. Step 19: Entering HP Matrix infrastructure orchestration settings The HP Matrix infrasturcture orchestration configuration screen enables you to configure HP Matrix infrastructure orchestration email server information.
Figure 20 HP Matrix infrastructure orchestration configuration Table 8 HP Matrix Infrastructure Orchestration configuration settings Option Description Mail From address Enter the email address that appears in the From field. Mail To address Enter the email address that appears in the email's To field. Drop-down list Enables you to select one option from the list of options available in the drop-down list.
Table 8 HP Matrix Infrastructure Orchestration configuration settings (continued) Option Description SMTP password Enter the password used to access the SMTP server. Confirm password Re-enter the password exactly as entered in the SMTP password field.
Table 9 HP Matrix Infrastructure Orchestration deployment server configuration option descriptions (continued) Deployment server configuration option Valid configuration settings • HP Insight Control server provisioning and Custom • HP Insight Control server provisioning, Ignite-UX, and Custom HP Insight Control server deployment • HP Insight Control server deployment and HP Insight Control server provisioning • HP Insight Control server deployment and Ignite-UX • HP Insight Control server deployment and
Figure 21 HP Matrix infrastructure orchestration deployment server configuration NOTE: If you select No deployment application, HP Matrix infrastructure orchestration does not support automated operating system provisioning as part of physical server provisioning. Table 10 HP Matrix infrastructure orchestration deployment server configuration option descriptions Option Description HP Insight Control server provisioning Enables Insight Control server provisioning as deployment application.
3. Click Next. Reconfigure deployment servers after upgrade from 7.2 to 7.3 During an upgrade from Matrix Operating Environment 6.3 to 7.2, the deployment server configuration data is not migrated. The upgrades to Matrix Operating Environment 7.2 from Insight Dynamics 6.2 and 6.3 are not affected.
1. Select Enable automatic download of ProLiant and Integrity Support Packs to a repository. NOTE: When you select the Enable automatic download of ProLiant and Integrity Support Packs to a repository option during the Insight Management installation, additional disk space is required for the located repository media. The disk space required also depends on the number of HP service support packs that are downloaded.
Step 23: Completing the installation After you click the Install button in the Installation Summary screen, the Installation Status screen appears and the Installer begins installing components. You can track the progress of the installation through the Overall Installation Progress bar at the bottom of the screen. When the installation completes, examine the Installation Status screen (scroll through component list, if necessary) to see whether all your chosen components installed successfully.
Figure 25 Installation finished screen The Installation finished! screen indicates that all of your chosen components are ready for final configuration and use. Click Close and proceed to the next chapter. From this screen, you can also use the links provided to run the HP Insight Management Advisor, view the installation log, configure Insight Remote Support Advanced, or open HP Systems Insight Manager.
Figure 26 Installation finished with errors screen The Installation finished with errors! screen enables you to view and correct installation errors. To view the installation errors, click View the installation errors. After you have fixed the errors, rerun the Installer to install the software components that encountered errors. From this screen, you can also view the installation log by clicking View the installation log file, or run the HP Insight Management Advisor.
• C:\Program Files\HP\Virtual Server Environment\conf\lsa\ hp_lsa_service.conf • C:\Program Files\HP\Virtual Server Environment\conf\lsa\ lsa.properties • C:\Program Files\HP\Virtual Server Environment\conf\lsa\ lsaclient.properties • C:\Program Files\HP\Virtual Server Environment\conf\lsa\vc\ vcController.properties • C:\Program Files\HP\Virtual Server Environment\conf\lsa\vmm\ vmmController.properties • C:\Program Files\HP\Virtual Server Environment\conf\lsa\storage\storageController.
3 Finishing the HP Insight Management installation This chapter describes the configuration tasks you must complete to ensure that HP Systems Insight Manager and HP Insight Management products are appropriately configured to monitor and manage your managed systems and other products in your hardware configuration. Assumptions The configuration procedures in this chapter assume the following: • You installed the Insight managed system setup wizard during the Insight Management installation procedure.
Figure 27 Insight Management component updates NOTE: Only Microsoft Proxy Server is tested and supported. Only basic authentication for Internet proxy servers is supported. The use of internet proxy server scripts and full NTLM authentication are not supported. 3. Click Check for Updates Now. A list of available updates appears.the results table includes the product name, installation status, available version number, installed version, release date, and a link to download.
as HP Systems Insight Manager GUI menu items, and the procedures in this chapter list both methods to launch the task. Figure 29 Finish the Installation area on the HP Systems Insight Manager home page The 1. 2. 3. 4. 5. tasks to complete include: Configure discovery and credentials Set up managed systems Add new users Configure email settings Set up automatic event handling To connect to the CMS and start HP SIM: 1. Open a browser window. 2.
Obtaining more information about using HP SIM If at any time you need more information about how to use HP SIM tools and features, how to complete a discovery, set credentials, or make protocol settings, click the Help icon (?) in the upper right corner of the screen. You can also find more information in the HP Systems Insight Manager user documentation at: http://www.hp.
2. 3. At the bottom of the screen, click New... to define a new discovery task. Do the following to define a discovery task: a. Under the New Discovery area, select Discover a group of systems. b. Provide a unique, intuitive name in the Name: field to identify the discovery task, for example, "iLO discovery" for the iLO discovery task or "WinProLiant discovery" for the Windows ProLiant discovery task. c.
Step 2: Running discovery tasks You should run the discovery tasks in the order specified in “Step 1: Defining discovery tasks” (page 47). Typical errors due to running discovery tasks in an improper order include: • Association errors. Can occur, for example if a server is not associated with a processor or a virtual machine management is not associated with a virtual machine management host. • Credentials errors.
Before you launch the Insight managed system setup wizard, all servers must be discovered with valid credentials stored within HP Systems Insight Manager. You must also have your license keys available for those products that require licensing. To configure managed systems: 1. Use one of the following methods to launch the Insight managed system setup wizard: 2. 3. 4. 5. 6. 7. 8. 9.
• Copies the new Performance Index Database. • Recomputes the pre-scaled data. • Restarts the Capacity Advisor data collection service. Recomputing can take several hours to run, depending on the number of systems and the amount of collected data. The text output for capupgrade provides an estimate of the time. The example below shows capupgrade being run on a CMS with 20 servers.
Step 8: Setting up automatic event handling on the CMS (optional) 1. 2. Use one of the following methods to configure event handling rules: • In the Finish the Installation area on the HP Systems Insight Manager home page, click Set up automatic event handling. • From the HP Systems Insight Manager GUI menu, select Options→Events→Automatic Event Handling→New Task... Enter the requested information for each of the steps, and then click Finish.
4 Optional post-installation configuration This chapter describes optional configuration tasks you can complete after installation is finished. Post upgrade procedures 1. To resolve any of the CMS-related issues, run vseassist from Diagnose→Troubleshoot Matrix Operating Environment→Check CMS Configuration. NOTE: 2. 3. 4. If you are unable to resolve the issues, contact the HP support. If HP SIM banner and home pages are customized, restore the customization files.
c. d. e. f. 3. 4. Click Search. Select the server you want to add, and then click Apply. Click Run now. Enter the credentials that you specified on the VMware vCenter Server Web Service page during the VMware vCenter Server installation. Provide the vCenter server name, port number, user name, and the password. Repeat these steps as many times as necessary to add all of your vCenter servers. Click OK.
In addition to the standard ports, Insight Control virtual machine management also opens additional ports dynamically. The free ports might be different at various instances of the agent, causing the exact port numbers to be different. Configuring HP Insight Control power management options Use Power Management Options to configure HP Insight Control power management settings and display options.
NOTE: Users with operator, user, or none template rights can only view and modify the Graph and Analysis Settings configuration of the Insight Control power management Options page. • Temperature Unit of Measurement. Select a unit of measurement for the temperature from the list. This setting is user-specific. • Power Unit of Measurement. Select a unit of measurement for power. • Use GMT for all timestamps in the graphs. Select this option to use Greenwich Mean Time (GMT) when graphing data.
NOTE: If a non-standard SSL port is configured in the Insight Control power management Options page, it must be updated in the Systems Insight Manager web service properties file available at HP SIM INSTALLED LOCATION\config\identification\additionalWsDisc.props. Failure to do so might result in Systems Insight Manager being unable to correctly identify management processors using the changed SSL port number. For more information, see HP SIM INSTALLED LOCATION\config\identification\additionalWsDisc_README.
1. Configure Matrix infrastructure orchestration users in Windows. The HP Insight Management Installer adds the user who installed the system to the HPIO_Administrators group. To add other users to any Matrix infrastructure orchestration user groups in group, use your computer management or administrative tools. 2. Configure the IO administrator group in Systems Insight Manager.
6. Switch between HP Server Automation (SA) cores IO 7.2 supports Insight Control server deployment 7.2 by default. To configure any version of SA support, copy the client library from the Server Automation core: a. Replace the file opswclient.jar from the 9.x SA Core found at \lib\ with the file of the same name from the SA Core to be configured with installed Matrix Operating Environment. The location of opswclient.
Manually adding the proxy WWNs With the Matrix Operating Environment 7.2 release (which includes Storage Provisioning Manager (SPM) version 2.2), SPM can manage the zoning of initiator and target WWNs. When upgrading from Insight Dynamics version 6.3 to Matrix Operating Environment version 7.1, SPM creates an Open Zoned unmanaged network for the pre-existing storage connections. That is, the Zoning State in the XML is set to Open rather than Zoned.
In order to prevent this, HP suggests that the Logical Server Automation service configuration file be modified to increase memory allocation as follows: 1. Locate the configuration file in the default location at \Virtual Server Environment\conf\lsa\hp_lsa_service.conf. 2. Edit the file and increase the value of wrapper.java.maxmemory=1024. HP suggests a value of 2048 for this setting. 3. Locate two available wrapper.java.additional.
3. 4. Locate timeout.update.subnet and change to a value of 15. Restart the Matrix infrastructure orchestration service From the Windows Start menu, select Administrative Tools->Services, look for HP Matrix infrastructure orchestration, and restart the service.
NOTE: SPM operations result from creating a storage pool entry for fulfillment through SPM or from provisioning a logical server (directly or from a Matrix service template), which uses SPM storage. Enabling or disabling the adapter results in a stop and restart of the SPM service. This may affect ongoing SPM operations. It is recommended to enable or disable the adapter when there are no SPM jobs running. Enabling the adapter To enable the adapter perform the following steps: 1.
. With the default adapter configuration, the SPM administrator must provide the EMC SMI-S credentials to the SPM GUI during the import array operation (the default port value is visible on the SPM GUI, other fields such as host, user, and password are set to blank). After you successfully discover the array, the most recently used credentials are stored into a data file located under state folder in the SPM install path.
NOTE: SPM operations result from creating a storage pool entry for fulfillment through SPM or provisioning a logical server manually or automatically from a Matrix infrastructure orchestration service template. Setting Flags on EMC Director Ports The EMC director ports that the SPM adapter uses must have fiber channel (FC) cable connections to a SAN switch and the ACLX flag on each of these ports must be enabled.
If there is a concern about knowing the right ports, you can partition the VSA and non-VSA ports across separate fabrics. For example, a fabric named Fabric_UX can contain all ports with VSA enabled, while another fabric Fabric_Win can contain the ports with VSA disabled. When defining the storage pool entry, you can choose the suitable fabric. If Matrix is auto-generating the storage pool entries, it will not know which fabric to choose to ensure that HP-UX uses Fabric_UX.
5 Uninstalling HP Insight Management This chapter lists the various methods for uninstalling Insight Management products and features. Uninstalling Insight Management Because the Insight Management Uninstaller checks for dependencies, you must use it to uninstall Insight Management products and features.
Figure 30 Installation directory TIP: 3. If you want to uninstall all Insight Management, select the Check/Uncheck check box. Click Next, and then click Yes to confirm that you want to uninstall the products and features you selected. Some software components may display dialog boxes that require answers for an uninstallation to successfully complete.
NOTE: Occasionally, during uninstallation, the Insight Management components may take longer time than expected while waiting for the HP SIM service to respond which results in a timeout. In such a scenario, cancel the uninstallation process, verify if the HP SIM service is running, and then retry the uninstallation. If the timeout occurs further, uninstall each of the components manually.
6 Troubleshooting Installation Error creating install event in HP SIM. On rare scenarios, the Installer returns the message Installation or upgrade completed with errors when product configuration fails. Suggested action: If the error is due to failure to create install event in HP SIM, then ignore this error as it would not affect the installation. Reconfigure job fails with undefined exit code 1 for SLES x.x OS. Reconfigure job fails with undefined exit code intermittently.
Insight Control virtual machine management In an environment using multiple instances of HP SIM CMS, Insight Control virtual machine management can only be installed on one CMS Systems Insight Manager manages devices by polling them periodically, receiving traps, and connecting to run tasks, such as software updates or scripts. A device can be polled by one or more instances of HP SIM.
Uninstalling Insight Control virtual machine management If HP SIM is uninstalled, then Insight Control virtual machine management is uninstalled. Insight Control virtual machine management can also be uninstalled using either of the following methods: • Close all virtual machine management screens. The screens must be closed before attempting uninstallation. • If HP SIM is installed, then HP SIM and Microsoft SQL Server must be running to successfully uninstall virtual machine management.
HP Matrix Recovery Management and HP Matrix Operating Environment HP Matrix Recovery Management installation fails and returns a “Setup failed” error message. The installation of HP Matrix Recovery Management and HP Matrix Operating Environment related components fails when there are parentheses () in the installation directory path. Suggested action You must not include parentheses () as part of the folder name in the installation directory path.
Virtual machine hosts are in different subnets For Microsoft Hyper-V servers, the Unable to register the VM / Fail to share the destination VM folder error message appears in the log file if either of the following occurs: • The source and destination Microsoft Hyper-V server hosts are in different subnets. • The destination folder on the virtual machine host cannot be shared.
Figure 31 Suggested Action: To resolve this issue: • Ensure that the system meets the minimum VC firmware version requirement to upgrade to v7.3. If the system does not meet the minimum requirement, then you must install the required VC firmware. • If the system has met all the required VC firmware version and the popup still appears on Windows 2012 system, then ignore the warning message and continue with the upgrade process. Installer Error messages A component failed to install.
Uninstaller error messages Uninstall of VCEM failed because VC Domain not removed from VCEM You have one or more VC domains still managed by VCEM. Suggested action: Remove VC domains from VCEM, then retry the uninstall. 1. Browse into the VCEM Home Page. 2. Remove all VC Domains from VCEM. For more information, see the HP Virtual Connect Enterprise Manager User Guide at http://www.hp.com/go/insightmanagement/docs. 3. After you have removed all VC domains, retry the uninstall.
7 Support and other resources Information to collect before contacting HP Be sure to have the following information available before you contact HP: • Software product name • Hardware product model number • Operating system type and version • Applicable error message • Third-party hardware and software • Technical support registration number – SAID (Service Agreement Identifier) How to contact HP Use the following methods to contact HP technical support: • In the United States, see the Customer
The service also provides access to software updates and reference manuals in electronic form as they are made available from HP. With this service, Insight Management customers benefit from expedited problem resolution as well as proactive notification and delivery of software updates. For more information about this service, see the following website: http://www.hp.com/services/insight Registration for this service takes place following online redemption of the license certificate.
HP Insight Management Installer HP Insight Management Installer for the 7.3 release includes product enhancements. The following is a list of changes that are applicable for the HP Insight Management 7.3 release. • Supports a direct upgrade to Insight Management version 7.3 only from 6.3 or later. • Supports Simplified Chinese locale. • Supports Internet Explorer 11 • Supports the following new operating system: ◦ Windows Server 2012 R2 Standard and Datacenter editions.
Table 13 Typographic conventions (continued) Key The name of a keyboard key. Return and Enter both refer to the same key. Term A term or phrase that is defined in the body text of the document, not in a glossary. User input Indicates commands and text that you type exactly as shown. Replaceable The name of a placeholder that you replace with an actual value. [] In command syntax statements, these characters enclose optional content.
8 Documentation feedback HP is committed to providing documentation that meets your needs. To help us improve the documentation, send any errors, suggestions, or comments to Documentation Feedback docsfeedback@hp.com. Include the document title and part number, version number, or the URL when submitting your feedback.
A Backing up the CMS The upgrade process is not reversible. If, after you begin, you decide not to complete the upgrade to Insight Management 7.2, a backup copy of your pre-7.2 environment is required to restore your CMS to the pre-upgrade state. HP recommends making a backup of the environment before upgrading the software. The following sections describe the process to back up and restore your pre-7.2 HP Matrix Operating Environment CMS configuration. “Back up your pre-7.
1. Before you stop the Insight Management services and back up your environment, quiesce the Insight Management components. The following actions need to be performed only for components that are installed and currently in use in your environment. NOTE: The steps may vary slightly depending on the version of software installed on your system. Refer to the product documentation for your release for additional information. For an HP-UX CMS, perform steps Step 1.fand Step 1.g only. a. b. c.
2. Stop the Insight Management services. a. On a Windows CMS, you can use the Windows Services utility to stop the Insight Management services. Table 15 describes the Insight Software 6.1 to 7.1 or earlier Windows services that you must stop before performing a backup. Refer to the product documentation for the list of Insight software services specific to your release. NOTE: If you are updating from Insight Software 6.
during installation. Hence the table Stop order of services might not always list the current set of services. Table 16 Steps to stop the Insight Management (previously Insight software) services running on an HP-UX CMS 3.
• C:\Program Files\HP\Matrix infrastructure orchestration\conf\hpio.properties • 5. C:\Program Files\HP\Insight Control virtual machine management\bin\windows\hpvmmsvc.conf Proceed with the upgrade. Do not restart the Insight Management services at this time. Restore your pre-7.2 CMS configuration Consider the following when you are restoring a CMS configuration: • After the upgrade process has successfully completed and the Insight Management 7.
4. 88 Restart the CMS.
Index A authorized resellers, 78 authorized users Systems Insight Manager, 44 automatic download HP Insight Management, 11 C Central Management Server (CMS) sign-in, 11 CMS configure, 44 commons-cli-1.0.
I Insight Control server migration service unable to communicate , 73 Insight managed system setup wizard configure, 44 Insight Management upgrade, 6 Insight Management Advisor configurations, 11 evaluates, 11 filter, 11 prerequisites, 11 results, 11 target system, 11 install components, 11 installation, 68 see also uninstall Insight Management fails to proceed, 72 uninstalling, 73 installing HP Insight Management, 11 L launching Systems Insight Manager, 44 M managed systems configure, 44 Matrix infrastru
HP Insight Control server deployment, 11 V VCEM Sub-range selction, 30 virt installed on only one CMS, 72 virtual connect domain group configure, 44 Virtual Connect Enterprise Manager standalone, 11 virtual machines not detected on mapped drives, 74 VMMclient.jar file fails to copy, 73 vmmsimtools.