Configuring HP Integrated Lights-Out 3 with Microsoft Active Directory HOWTO, 2nd edition Introduction ......................................................................................................................................... 2 Integration using the Lights-Out Migration Utility ...................................................................................... 2 Integration using the iLO web interface .........................................................................................
Introduction This paper tells you how to integrate HP Integrated Lights-Out 3 (iLO 3) processors with Microsoft® Windows® Active Directory (AD) software to streamline configuration and avoid possible security issues. It describes how to validate the directory after you finish the integration. The rest of this paper refers to iLO 3 simply as iLO. Integrating iLO with AD lets you have the same level of security as when you log into a Windows environment.
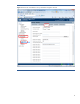
Figure 1: HPQLOMIG directory access window lets you select Directory Configuration or Kerberos authentication.
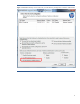
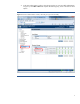
3. Go to the Configure Management Processors window to browse the directory for security groups (Figure 2). Click Browse and then Next. Figure 2: Use the HPQLOMIG Configure Management Processor window to browse for security groups.
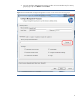
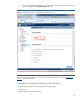
4. A new window opens (Figure 3). Select a group and click Open. This step sets privileges for the selected group. Figure 3: Set privileges in the HPQLOMIG distinguished name security groups window. 5. Repeat steps 3 and 4 for each group you want to assign privileges. After you set the group privileges, you are ready to validate the directory. Go to the “Validating the directory” section of this paper.
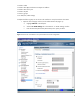
Figure 4: Use the iLO web interface to set up schema-free integration with AD.
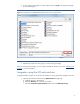
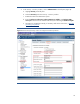
2. In the User Administration window, select the group that you want to modify (Administrator in Figure 5). Click Edit or New and complete the following step, which is the same for both options. Figure 5: In the User Administration window, select the group you want to modify.
3. Enter the group distinguished name in the Edit Directory Group window. Select the desired group privileges and click Update Group (Figure 6). Figure 6: Modify group settings in the Add/Edit Directory Group window. After you set the group privileges, you are ready to validate the directory. Go to the “Validating the directory” section of this paper.
• Kerberos realm • Kerberos KDC (Key Distribution Center) server address • Kerberos KDC server port • Kerberos keytab • Directory groups • iLO date/time, SNTP settings Complete the following steps to use the iLO web interface to set up the Kerberos host name. 1. Open the iLO web page and click on the Administration tab (Figure 7): a. Highlight Network in the left pane. b. Select the IP & NIC Settings tab in the Network – IP & NIC Settings window. c.
2. In the Security – Directory window, click on Administration in the left pane (Figure 8). a. Highlight Security in the left pane. b. Select the Directory tab in the Security – Directory window. c. Enable the Kerberos Authentication option. d. Enter the Kerberos realm name, Kerberos KDC server address, and Kerberos KDC server port. Then browse to and select the binary file containing the Kerberos keytab. e. Generate your keytab file manually, if necessary.
Note: To get the ktpass and SetSPN commands for execution on Windows XP, install the Windows Server 2003 Service Pack 2 support tools, KB926027 or later. Earlier versions will not work. You can also install KB926027 on Windows Vista, but not all features will work correctly. The ktpass and SetSPN commands will work correctly. 3. Click Administration and then User Administration in the left pane (Figure 9). 4. Select the Directory Group that you want to modify (user0 in Figure 9). Click Edit or New.
synchronized. Either allow the associated server to set the date/time, or enable the SNTP settings feature within iLO. Figure 10: Use the iLO Overview window to synchronize date and time references.
6. To enable SNTP, select Administration > Network > SNTP Settings (Figure 11). Figure 11: Use the Network – SNTP Settings window to configure SNTP settings. Manually generating a keytab file The example in this section shows how to generate a keytab file for the iLO interface in a Windows environment. Use the ktpass command to generate a keytab file and set the shared secret. Note that the command is case sensitive and has special characters: ktpass -out iloexample.
WARNING: pType and account type do not match. This might cause problems. Key created. Output keytab to iloexample.keytab: Keytab version: 0x502 keysize 69 HTTP/iloexample.example.net@EXAMPLE.NET ptype 3 (KRB5 _NT_SRV_HST) vno 3 etype 0x17 (RC4-HMAC) keylength 16 (0x5a5c7c18ae23559acc2 9d95e0524bf23) Note that ktpass may prompt that it is unable to set the UPN. This is acceptable because the iLO interface is a service, and not a user.
Validating the directory To validate the directory, select the Directory tab in the web interface. Then click Test Settings (Figure 12). Figure 12: Use the Security – Directory window to validate the Lights-Out directory settings.
When the Directory Tests window appears, click Start Test (Figure 13). Figure 13: Click the Start Test button to initiate the Directory Tests.
Test results The Results screen (Figure 14) reports after the tests complete, after a test fails, or after you cancel the tests. Depending on the test selected, you can see results for specific directory settings or for an operation using one or more directory settings. The directory may not be available if the directory test fails. The Overall Status line summarizes results of the whole test series. Figure 14: Check the Directory Test Results after the tests complete.
Canceling tests Click on the Stop Test button (Figure 15) to cancel tests in progress. A test may not stop immediately. Directory tests with Stopping in the Result field have not yet reached a point where they can stop. HPQLOMIG does not update the test results automatically if you cancel a test. Use the Refresh button (Figure 15) to check whether the tests have completed or stopped. Figure 15: Cancel tests in progress or use the Refresh button to check their status.
Table 1: Directory settings tests and possible results Test name Successful result Failed result Ping Directory Server The directory server responds to the ping test. The iLO processor could not verify a host at the Directory Server Address. Directory Server DNS Name The directory server address uses the DNS naming format, and iLO successfully searched for a network address using the directory server name. iLO could not get an IP address for the directory server.
Test name Successful result Failed result Directory User Context The test passes when a user login succeeds using the directory user context. The test also passes when iLO can find the context container object in the directory using the administrator’s credentials. You can only test contexts beginning with "@" by user login. The object could not be located when the iLO used the Directory Administrator credentials to search for the container. iLO 3 v1.
User login considerations The Name field on the iLO login page can accept Directory user names in the following forms: • LDAP fully distinguished name such as cn=John Smith, cn=Users, dc=MyCompany, dc=COM • DOMAIN\user name form such as MyCompany\jsmith • Username@domain form such as jsmith@MyCompany.com • User name form such as John Smith You can use a maximum of 1024 characters (1 kilobyte) for the Directory Services/user/names.
If AD authentication fails, check the event log for an LDAP error, as illustrated in Figure 16. Figure 16: Check the event log for an LDAP error. Testing for a non-working SSL A domain controller with a non-working SSL can cause authentication problems in its domain. Follow these steps to test SSL: 1. To see which domain controller handles requests for the domain, open a browser and navigate to https://:636 or to https://:636. 2.
For an alternate method to check SSL, use the Microsoft ldp.exe tool. NOTE: It may be useful to test multiple domain controllers for issuing a certificate. iLO can use a backup domain controller if the primary domain controller is unavailable. Removing/replacing old certificates An old certificate on a domain controller may point to a previously trusted Certificate of Authority (CA) with the same name.
Configuring the Kerberos client with Internet Explorer To log into iLO, you must be a member of a group with assigned permissions. For Windows clients, locking and unlocking the workstation will refresh the login credentials for iLO. Home versions of Windows operating systems do not support Kerberos. To enable single sign-on with Internet Explorer (IE), complete the sequence of steps in the following sections. Enabling authentication in Internet Explorer 1.
Verifying that the iLO domain is in the Intranet zone 1. From your Home page, select Tools > Internet Options. 2. Select the Security tab (Figure 18). 3. Click the Local Intranet icon, and then click the Sites button. Figure 18: Configure local Intranet sites in Internet Explorer.
4. Click the Advanced button. 5. Enter the website name in the text box provided (Figure 19). Figure 19: Add website to the zone. 6. Click Add and then Close. 7. Click OK. 8. Click OK.
Setting custom security levels 1. From your Home page, select Tools > Internet Options. 2. Select the Security tab (Figure 20). 3. Click the Local Intranet icon, and then click the Custom level… button. Figure 20: Configure custom security levels in Internet Explorer.
4. Scroll to User Authentication (Figure 21). Figure 21: Verify User Authentication in Internet Explorer. 5. Select Automatic logon only in Intranet zone. 6. Click OK. 7. Click OK. 8. If you changed any of the options, close and restart Internet Explorer. 9. Once you restart Internet Explorer, use the fully qualified domain name to browse to the iLO interface and sign in. 10. Click the HP Zero Sign In button (Figure 22) to logon to iLO.
Figure 22: Click the HP Zero Sign In button to logon to iLO.
Configuring the Kerberos client with Firefox To enable single sign-on with Firefox, complete the following sequence of steps. Setup for Firefox 3.5 and for Firefox 3.6 is similar. 1. To open the browser configuration page, enter about:config in the space provided (Figure 23), and click the Open button. Figure 23: Open the browser configuration page. If the message “This might void your warranty!” appears, click the I’ll be careful, I promise! button. 2. In the Filter field, enter network.
5. Browse to the iLO interface using the fully qualified domain name. 6. Browse to the iLO login page, and click the HP Zero Sign In button (Figure 25). Figure 25: Click the HP Zero Sign In button to logon to iLO.
If a prompt for credentials appears (Figure 26), Kerberos authentication failed and the system fell back to NTLM (Windows NT LAN manager) authentication instead. Figure 26: If the Credentials prompt appears, Kerberos authentication failed. Browse to the iLO login page, and log in by name. Use the username in the Kerberos SPN form and the associated domain password. Conclusion Increasingly, enterprise customers are using directory services to address security and to reduce management costs.
For more information Visit the URLs listed below if you need additional information. Resource description Web address Integrated Lights-Out products www.hp.com/go/iLO “Integrated Lights-Out Technology: Enhancing the Manageability of ProLiant Servers” technology brief http://h20000.www2.hp.com/bc/docs/support/SupportManu al/c00257345/c00257345.pdf HP ProLiant servers and solutions www.hp.com/servers/proliant Send comments about this paper to TechCom@HP.com Follow us on Twitter: http://twitter.