
Installation Guide, Second Edition - HP Integrity BL60p Server Blade


Accessing iLO MP
Remote Access Security Requirements
Chapter 6
59
Allowing Remote Access to the Server Blade
If you choose to configure your iLO MP remote access using DHCP or ARP ping, use the following steps to
secure remote access to your server blade. To secure remote access you need to change your MP password.
Perform the following steps to change your MP password:
Step 1. From the MP Main Menu, enter CM to get to the Command Menu.
The Command Menu displays.
Step 2. From the Command Menu, enter UC to get to the User Configuration Menu.
The User Configuration Menu displays.
Step 3. From the User Configuration Menu, enter C to get to the Change Current User options.
Step 4. Change 1-Admin by entering 1.
A list of options available to change displays.
Step 5. Change your password by entering P.
Enter your new password in the dialog box.
Your password must be between 8 and 24 characters.
Disabling Remote Access to the Server Blade
Use the following steps to disable remote access to your server blade.
Step 1. From the MP Main Menu, enter the CM command to get to the MP Command Menu screen.
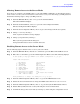
Step 2. Enter the LC command to get to the LAN Configuration Menu screen. The following displays:
At each prompt you may type DEFAULT to set default configuration or Q to Quit
Default LAN Configuration:
- - MAC Address :0x00110aa50058
D - DHCP status :Enabled
I - IP Address :127.0.0.1
M - MP Host Name :mp00110aa50058
S - Subnet Mask :255.255.255.0
G - Gateway Address :127.0.0.1
L - Link Status :Auto Negotiate
W - Web Console Port Number :2023
- - SSH Access Port Number :- (MP Feature Not Licensed)
- - IPMI / LAN Port Number :623
Enter parameter(s) to change. A to modify All. Or (Q) to Quit:
Step 3. From the LAN Configuration Menu, enter D to get to the DHCP Status screen.
Step 4. Follow the onscreen instructions to change the DHCP status from Enabled to Disabled.
Step 5. From the LAN Configuration Menu, enter SA to get to the System Administration menu.
Step 6. Disable Telnet, SSH, and web access by following the on-screen instructions.
Step 7. Confirm the changes have been made by entering LC, and viewing the configuration screen.