
Installation Guide, Second Edition - HP Integrity BL60p Server Blade


Adding Additional Components
Adding Internal Components
Chapter 3
41
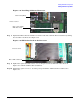
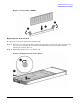
Figure 3-11 Installing Additional Processor
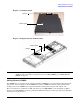
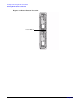
Step 8. Tighten the ZIF socket lock with the 2.5 mm hex end of the (ACX-15) Torx screwdriver by turning
the screwdriver clockwise. See Figure 3-12.
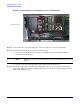
Figure 3-12 ZIF Socket Lock on the Processor
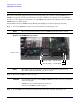
Step 9. Tighten the captive shoulder screws (1 - 4) on the processor heat sink in the order shown in
Figure 3-13 with the (ACX-15) Torx screwdriver.
Step 10. Tighten the captive screws (5 - 6) on the power pod with the (ACX-15) Torx screwdriver. See
Figure 3-13.
Front of server
CPU 0 slot (filled)
CPU 1 slot (empty,
with dust cover)
Front of server
CPU 1 ZIF socket lock