
Installation Guide, Second Edition - HP Integrity BL60p Server Blade


Installing and Powering On the Server Blade
Installing the Server Blade into the Enclosure
Chapter 4
48
Installing the Server Blade into the Enclosure
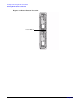
The following procedure shows how to install the server blade into a standard enclosure.
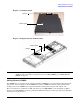
IMPORTANT Before installing the server blade into the enclosure, write down the information on the label.
Write down the UUID, the Product number, server blade serial number, the MAC address, and
the iLO MP MAC address of the server located on the top panel of the server blade. See
Figure 4-1. You will need this information later in the install process (“Configuring ARP Ping to
Enable iLO MP Access” on page 55), and also for replacement procedures.
NOTE Server blades are set to power up automatically upon insertion into the enclosure. If you have
changed this setting, use the power button to power on the server blade.
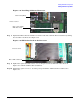
Step 1. Ensure the extraction lever is released (open) on the server blade.
Step 2. Slide the server blade into the enclosure (1). See Figure 4-1.
Step 3. Close the extraction lever (2).
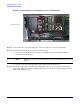
The server blade should come up to full power. The server blade is at full power if the top power
LED is green and the system LED is green. If the system LED is amber then the server blade is in
standby power mode. Press the power button to power the server blade to full power.
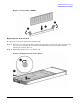
Figure 4-1 Installing a Server Blade into the Enclosure
UUID, product number
and iLO MP MAC
address label
MAC address,
serial number,