
Installation Guide, Second Edition - HP Integrity BL60p Server Blade


Configuring iLO MP Access
Configuring DHCP to Enable iLO MP Access
Chapter 5
52
Configuring DHCP to Enable iLO MP Access
Use this procedure to use DHCP in order to access iLO MP functionality. The server blade comes from the
factory with DHCP enabled. This procedure assumes that you have a DHCP server connected to the same
network as your server blade.
Step 1. Enter the default host name (or the assigned DHCP IP address) in the telnet login window (or web
address field) to connect to the iLO MP.
The default host name is the letters “mp” in front of the 12-character MAC address. The MAC
address is located on the MAC address label. Retrieve the MAC and iLO MP MAC addresses you
wrote down to get the MAC address (see “Installing the Server Blade into the Enclosure” on
page 48).
NOTE If step 1 does not work, you may not have access to a domain name server (DNS)
along with the DHCP server. You need to contact your DHCP Server Administrator
to get your assigned DHCP IP address for log in.
Step 2. Click OK. You should now be at the MP prompt. Proceed to Chapter 6, “Accessing iLO MP,” on
page 57.
Configuring the RS-232 Port to Enable iLO MP Access
Use the following procedure to configure the RS-232 port to enable iLO MP access. To do this procedure, you
need to have a terminal emulator (for example, a laptop) to connect with.
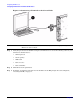
Connecting the Local I/O Cable to the Server Blade
Use the following procedure to connect your server blade to a terminal device using your I/O cable port.
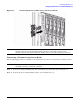
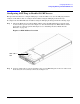
NOTE The mylar port cover states that the BL60p server blade does not support the use of the LAN
and VGA connectors on the local I/O cable, as shown in Figure 5-1.
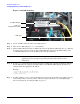
Step 1. Fold back the mylar port cover from the front of the server blade.
Step 2. Insert the local I/O cable into the I/O cable port. See Figure 5-1.
CAUTION Disconnect the local I/O cable from the port when not in use. The port and connector are not
intended to provide a permanent connection.