
User Service Guide, Second Edition - HP Integrity BL60p Server Blade


Removing and Replacing Components
Removing and Installing a Server Blade After a Server Blade Failure
Chapter 4
63
Step 1. Gracefully shut down the operating system (if necessary). See “Boot and Shut Down HP-UX” on
page 101.
Step 2. Power off the server blade (if necessary). See “Power Off the Server Blade” on page 44.
Step 3. Remove the server blade from the enclosure. See “Removing the Server Blade from the Enclosure”
on page 45.
Step 4. Remove the hard disk drives. See “Removing a Hot-Plug SCSI Hard Drive” on page 42.
Step 5. Remove the access panel. See “Removing the Server Blade Access Panel” on page 47.
Step 6. Remove the memory DIMMs. See “Removing a DIMM” on page 55.
Step 7. Remove the processors. See “Removing a Processor” on page 58.
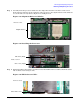
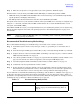
Step 8. Write down the UUID and the product number on the label of the failed server blade. You will need
these numbers in step 9, and also when booting the new server blade. See Figure 4-27 for the label
location on the server blade.
Figure 4-27 Server Blade Label
IMPORTANT Failure to add the UUID and product number to the new server blade will result in
server blade degradation or failure. Ensure you write these values down and store in
a safe place for use when booting the new server blade.
Step 9. Write the UUID and Product number from the failed server onto the space provided on the label of
the new server blade. Write down the serial number of the new server blade. Keep these numbers
in a safe place. You will need these numbers later when booting the server blade.
Step 10. Install the hard disk drives. See “Replacing a Hot-Plug SCSI Hard Drive” on page 43.
Step 11. Install the memory DIMMs. See “Replacing a DIMM” on page 57.
Step 12. Install the processors. See “Replacing a Processor” on page 59.
Step 13. Install the access panel. See “Replacing the Server Blade Access Panel” on page 47.
Server blade label