
HP Integrity cx2600 Operations and Maintenance Guide
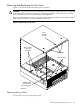
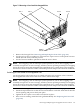
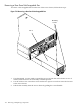
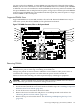

Figure 7-9 Removing a Front Panel Hot-Swappable Fan
chasfan1xtnd
Captive
Screws
Fan 1 Fan 2 Fan 3 Fan 4
1. Remove the front grill. See “Removing and Replacing the Front Grill” (page 122).
2. Use the ACX-15 Torx screwdriver to loosen the two captive screws on the plastic extractor
handle (left side of fan) until they release.
3. Use the extractor handle to pull the fan from the server chassis.
NOTE: Hot-swapping a fan can interrupt system operation. If you are hot-swapping a fan
assembly in response to an error message, and the system is operating normally, hot-swapping
the fan in less than 30 seconds eliminates the requirement for a system reboot. Hot-swapping
the fan in less than two minutes enables continued operation and prevents automatic shutdown.
Installing a Front Panel Hot-Swappable Fan
You do not need to remove the server or extend it from the rack to replace a fan. To install a
hot-swappable fan in the front of the server chassis, follow these steps:
NOTE: Hot-swapping a fan can interrupt system operation. If you are hot-swapping a fan
assembly in response to an error message, and the system is operating normally, hot-swapping
the fan in less than 30 seconds eliminates the requirement for a system reboot. Hot-swapping
the fan in less than two minutes enables continued operation and prevents automatic shutdown.
1. Remove the front grill. See “Removing and Replacing the Front Grill” (page 122).
2. Orient the replacement fan so that the extractor handle is on the left. Insert the fan into the
chassis opening and press it firmly into place.
3. Tighten the two captive screws that secure the fan in place.
4. If the server is running, install the front grill immediately. See “Replacing the Front Grill”
(page 122).
Removing and Replacing Hot-Swappable Chassis Fan Units 125