
HP Integrity cx2600 Operations and Maintenance Guide

5. Remove the memory airflow guide. See “Removing the Memory Airflow Guide” (page 128).
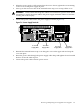
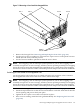
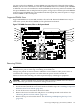
6. Locate the DIMMs you want to remove (Figure 7-12).
7. Press down on the DIMM socket retainer clips on either end of the DIMM connector until
the DIMM ejects from the connector.
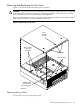
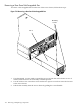
8. Lift the DIMM from the system board socket (Figure 7-13). If the removed DIMM is functional,
store it for future use. Store DIMMs in static-free containers.
9. Repeat steps Step 6 through Step 8 for each DIMM you want to remove.
10. If you do not install DIMMs immediately, set the memory airflow guide in position and
reinstall the top cover. See “Installing the Memory Airflow Guide” (page 128), and to
“Removing and Replacing the Top Cover” (page 123).
Installing DIMMs
You must install DIMMs in groups of four (quads), and in specific locations. DIMM sockets are
shown in Figure 7-12.
• You must install the first quad (four DIMMs) in sockets 0A, 0B, 1A, and 1B.
• You can install the second quad in sockets 2A, 2B, 3A, and 3B.
• You can install the third and final quad in sockets 4A, 4B, 5A, and 5B.
• If you are installing DIMMs of different sizes, you must install the smallest DIMMs (least
memory) in the first quad.
• DIMMs in the second quad can be equal to or larger than (more memory) the DIMMs in the
first quad.
• If you install DIMMs in the third quad, they must be equal to or larger than the DIMMs in
the second quad.
WARNING! Ensure that the system is powered off and all power sources are disconnected
from the server prior to removing or installing server hardware.
Voltages are present at various locations within the server whenever a DC power source is
connected. This voltage is present even when the main power switch is turned off.
Failure to observe this warning can result in personal injury or damage to equipment.
CAUTION: Observe all ESD safety precautions while performing DIMM installation. Failure
to follow ESD safety precautions can result in damage to the server.
NOTE: You must install DIMMs in matched groups of four. DIMM sizes can vary between
quads, but all DIMMs within a quad must be identical.
To install DIMMs, follow these steps:
1. If rack-mounted, extend the server out from the rack until it stops. See “Installing Components
When the Server Is in a Rack” (page 114).
2. Power off the server. Disconnect all external cables.
3. Remove the server from the rack and place it on an ESD-protected work surface. See
“Removing the Server From a Rack” (page 115).
4. Remove the top cover from the chassis. See “Removing and Replacing the Top Cover”
(page 123).
5. Remove the memory airflow guide. See “Removing the Memory Airflow Guide” (page 128).
6. Locate the DIMM sockets where you want to install the DIMMs (Figure 7-12).
7. Hold the DIMM by its left and right edges and orient the DIMM so that the component side
is facing the processors.
8. Insert the DIMM into the appropriate socket (Figure 7-13).
130 Removing and Replacing Components