
HP Integrity cx2600 Operations and Maintenance Guide


3. If a cable blocks card removal, or if it is connected to the card, disconnect the cables from
the card connectors.
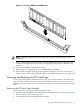
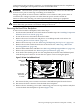
4. Use the ACX-15 Torx screwdriver to remove the retaining screws (M3 x 6mm long pan
T15/slot squire cone stainless steel) that secures the card in place (Figure 7-16).
Figure 7-16 PCI Card Retaining Screws
pciccscrw2
Card
Retaining
Screws
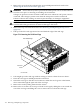
5. Grasp the card by the two opposite edges and lift the card from the socket.
6. If there are any empty sockets in the card cage, install a blank panel in the bulkhead opening
at the end of the card cage. The blank panel is necessary to ensure correct airflow when the
card cage is installed in a working server.
Installing a PCI Card
NOTE: You must remove the PCI card cage from the server chassis to install PCI-X cards.
The four connectors in the PCI card cage are identical and have the same capabilities. You can
install a compatible PCI card in any slot.
CAUTION: Observe all ESD safety precautions while performing this procedure. Failure to
follow ESD safety precautions can result in damage to the server.
To install a PCI card, follow these steps:
1. Remove the PCI card cage from the server chassis. See “Removing the PCI Card Cage
Assembly” (page 131).
2. Remove the cover from the PCI card cage.
3. If a blank panel is installed at the bulkhead end of the card cage for the card position or
socket you want to use, remove the blank panel.
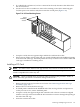
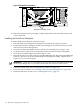
4. Grasp the card by the opposite edges and orient the card so that its connector is aligned
with the card cage socket and extend the PCI-X interface connector through the opening at
the end of the card cage.
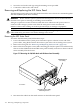
5. Insert the card into the socket.
Removing and Replacing PCI Cards 135