HP Server Slide Mount Kit AB296A for HP 10000 Rack Installation Instructions Manufacturing Part Number: AB296-96001 April 2004 U.S.A. © Copyright 2004 Hewlett-Packard Development Company, L.P..
Legal Notices Copyright Notices. © Copyright 2004 Hewlett-Packard Development Company, L.P. The information contained herein is subject to change without notice. The only warranties for HP products and services are set forth in the express warranty statements accompanying such products and services. Nothing herein should be construed as constituting an additional warranty. HP shall not be liable for technical or editorial errors or omissions contained herein. Printed in the U.S.A.
1 HP Server Slide Mount Kit for HP 10000 Rack – Installation Instructions Introduction This manual provides instructions for installation of the hp Integrity cx2600 server chassis on slides in a HP 10000 rack. Cabinet Safety Precautions WARNING Ensure that the rack is level and stable before working on the rack. Be sure the leveling jacks (feet) extend to the floor and that the full weight of the rack rests firmly on the floor. WARNING Ensure that the rack has anti-tip measures in place.
HP Server Slide Mount Kit for HP 10000 Rack – Installation Instructions Introduction Mounting Kit Contents This manual provides installation instructions for server mount kit AB296A.
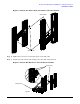
HP Server Slide Mount Kit for HP 10000 Rack – Installation Instructions Installation Procedure Installation Procedure Figure 1-1 HP Integrity cx2600 Servers Mounted in a HP 10000 Rack 2600inrack2 Mounting Kit Before mounting your server in the HP 10000 rack, inspect the mounting kit hardware. A mounting kit parts list is provided at the rear of this manual. Mount the Server Mount a server in the HP 10000 rack as follows: Step 1. Open the slide assembly package and remove the shipping bracket.
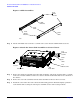
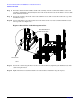
HP Server Slide Mount Kit for HP 10000 Rack – Installation Instructions Installation Procedure Figure 1-2 Slide Assemblies Rear Mount Bracket Slide Bracket Inner Slide Front Mount Bracket Outer Slide slides Step 2. Attach a HP 10000 rack ear slide to each side of the server chassis with T15 flathead screws. Figure 1-3Attach the Inner Slide Assemblies to Server Chassis T15 Flathead Screws Rack Ear Slide T15 Waferscrews chasrails2 Inner Slide Inner Slide Step 3.
HP Server Slide Mount Kit for HP 10000 Rack – Installation Instructions Installation Procedure Figure 1-4Attach the Outer Slide Assemblies to Rack Columns Outer Slide T15 Screws rckrails4 Step 6. Tighten the rear screws (loosened in step 4) on the slide rails. Step 7. Install cage nuts in front rack columns, above the slide as shown below.
HP Server Slide Mount Kit for HP 10000 Rack – Installation Instructions Installation Procedure Step 8. Insert the chassis-mounted slides (inside rail assembly) into the rack-mounted slides (outer rail assembly) and push the chassis fully into the rack. Press the blue tabs on the slides to release slide locks and allow insertion. Step 9. Secure the chassis to the front of the rack with T25 screws. (The screws thread into the cage nuts installed in step 7.) Step 10.
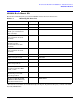
HP Server Slide Mount Kit for HP 10000 Rack – Installation Instructions AB296A Rack Mount Kit AB296A Rack Mount Kit The HP Server Mounting Kit, part number AB296A includes the items listed below.
HP Server Slide Mount Kit for HP 10000 Rack – Installation Instructions AB296A Rack Mount Kit 10 Chapter 1