
Installation Guide, Second Edition - HP Integrity cx2620


1. Turn off and disconnect system power. Disconnect power at the dc source end of the power
cables, using the disconnect device that is part of the rack or facility power system.
2. Label and disconnect all cables from the unit rear panel connectors.
3. Remove or loosen (as appropriate) the screws that fasten the server to the rack.
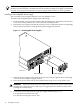
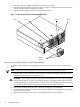
4. Label and disconnect the rack or facility ground cable from the chassis rear panel (Figure 1-4).
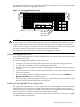
Figure 1-4 Chassis Ground Lug
chasgndlug
Chassis
Ground
Lug
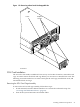
5. If the server is slide-mounted, slowly pull the chassis forward (or push from the rear) to
extend the chassis from the rack. The server is fully extended when the rail clips are locked
in place. Do not extend tray-mounted servers. Tray-mounted servers are not locked in place
and can fall if extended from a rack.
6. Disengage the slides or mounting hardware and take the server to a static-free work station.
Install the Server into a Rack
WARNING! Do not attempt to lift the server alone. The server can weigh as much as 22.7
kilograms (50 lbs.). Serious injury can result if this warning is not observed.
To insert the server into the rack, follow these steps:
1. Engage the server slides or mounting kit, as appropriate.
2. Slide the server inward and push the server into the rack until it is in position.
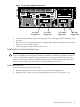
3. Connect server cables to rear panel connectors.
4. Connect the rack or facility ground cable to chassis ground lug.
5. Replace or tighten the screws that fasten the server to the rack.
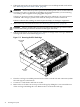
Installing Hot-Pluggable Disk Drives
The supported configuration of a server includes one, two, or three Low-Voltage-Differential
(LVD), hot-pluggable disk drives. If any of the three disk drives are not installed, you must install
a disk filler in the disk location.
22 Installing the System