
Installation Guide, Second Edition - HP Integrity cx2620


WARNING! Voltages are present within the server when power is applied. Do not remove the
server top cover without first turning off and disconnecting power. Always replace the top cover
before turning the system on.
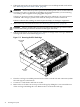
1. Power off and disconnect system power. Disconnect power at the dc source end of the power
cables, using the disconnect device that is part of the rack or facility power system.
2. Slide the server out from the rack until it stops.
3. Remove the server from the rack and place it on an ESD-protected work surface. See
“Removing the Server from a Rack” (page 21).
4. Use the ACX-15 Torx screwdriver to loosen the captive screw that holds the top cover in
place.
5. Slide the cover toward the rear of the server chassis and lift it straight up.
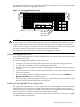
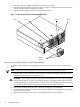
Installing Hot-Swappable Chassis Fan Units
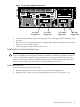
There are five hot-swappable chassis fan units in the HP server. Fan units 1, 2, 3 and 4 are
accessible from the front of the chassis. Fan unit 5 is accessible from the rear of the chassis. Fan
units 1, 2, 3 and 4 are identical and interchangeable.
If a fan failure is total (both rotors), or if the fan has been removed from the chassis for more than
30 seconds, the system logs the event as a critical error. A critical error causes the system LED
to flash red, and requires a reboot to reset the error status. A total fan failure (including removal)
for more than two minutes results in system shutdown. If you are hot-swapping a fan assembly
in response to an error message, and the system is operating normally, hot-swapping the fan in
less than 30 seconds eliminates the requirement for a system reboot. Hot-swapping a fan in less
than two minutes enables continued operation and prevents automatic shutdown.
CAUTION: Operating the server with the front grill removed risks EMI. Operate the server
with the front grill removed only when hot-swapping a fan. Always replace the front grill
immediately after replacing a fan.
Observe all ESD safety precautions while performing this procedure. Failure to follow ESD safety
precautions can result in damage to the server.
NOTE: A hot-swappable device does not require interaction with the operating system before
the device is removed from or installed into the server.
The power to the server does not have to be off to remove or replace a hot-swappable chassis
fan unit.
Removing and Installing a Front Panel Hot-Swappable Fan
The server does not need to be removed or extended from the rack to enable fan replacement.
To remove and install a hot-swappable fan from the front of the server chassis, follow these steps:
CAUTION: Hot-swapping a fan can interrupt system operation.
If you are hot-swapping a fan assembly in response to an error message, and the system is
operating normally, hot-swapping the fan in less than 30 seconds eliminates the requirement for
a system reboot.
Hot-swapping the fan in less than two minutes enables continued operation and prevents
automatic shutdown.
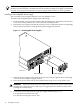
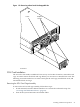
1. Remove the front grill. See “Removing the Front Grill” (page 26).
2. Use the ACX-15 Torx screwdriver to loosen the two captive screws on the plastic fan extractor
handle (left side of fan) (Figure 1-9).
Installing Additional Components 27