
Installation Guide, Second Edition - HP Integrity cx2620
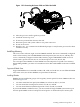
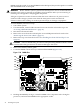
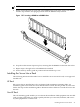

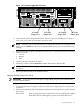
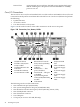


Figure 1-23 Connecting the Power Cable and Turbo Fan Cable
16. Place the processor airflow guide in position.
17. Install the chassis top cover.
18. If necessary, reinstall the chassis in the rack.
19. Reconnect power and system cables to rear panel connectors.
20. Power on the server.
21. Run the info cpu command at the EFI Shell prompt to verify that the processor has been
installed correctly.
Installing Memory
The server comes with four, eight, or twelve DIMMs installed. The server is minimally configured
with 1 GB of memory (four 256 MB DIMMs loaded in quad 0 (slots 0A, 0B, 1A, and 1B)). The
server is maximally configured with 32 GB of memory, eight 4 GB DIMMs loaded in each of
quads 0 and 1 (quad 0 slots 0A, 0B, 1A, and 1B, and quad 1 slots 2A, 2B, 3A, 3B).
You can replace these DIMMs or insert DIMMs into unused quads to expand server memory.
When adding DIMMs, you must use a minimum of four like-sized DIMMs in the next available
quad.
Supported DIMM Sizes
Supported DIMM sizes are 256 MB, 512 MB, 1 GB, 2 GB, and 4 GB. You can use different DIMM
sizes in the server, but all four DIMMs in a quad must be identical.
Installing DIMMs
DIMMs must be installed in groups of four (quads), and in specific locations. DIMM sockets are
shown in Figure 1-24.
• You must install the first quad (four DIMMs) in sockets 0A, 0B, 1A, and 1B.
• You can install the second quad in sockets 2A, 2B, 3A, and 3B.
• You can install the third (and final) quad in sockets 4A, 4B, 5A, and 5B.
If you install DIMMs of different sizes, you must install the largest DIMMs (most memory) in
the first quad. DIMMs in the second quad can be equal to or smaller than (less memory) the
Installing Additional Components 41