
User Service Guide, Third Edition - HP Integrity cx2620 Server

2. Squeeze inward on the release clip and pull the release lever to pull the drive from the server
chassis.
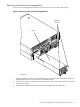
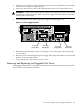
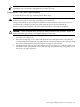
Figure 6-9 Disk Drives in Server
dskdrvfrnt1
2
1
0
S
C
S
I
Release
Clip
Release
Lever
Installing Hot-Pluggable Disk Drives
To install a hot-pluggable disk drive, follow these steps:
1. If required (OS does not support hot-plugging devices), stop the operating system.
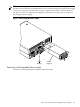
2. If a disk filler is installed, remove it by pulling the release lever.
3. With the release lever pulled out, slide a hot-pluggable hard disk into the disk slot until it
is seated.
4. Press the release lever until it is flush with the front of the server. The release lever clicks as
it locks into position.
5. If you stopped the operating system in step 1, reset the system to the EFI Boot Maintenance
Menu to rescan the hard drives.
6. If the operating system was stopped in step Step 1, use the EFI Shell map command to verify
that you have correctly installed the newly inserted drive.
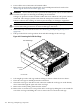
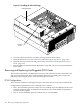
Removing and Replacing the PCI-X Card Cage
The server has four 64-bit, 133 MHz PCI-X accessory card sockets located in a removable card
cage. You must remove the PCI-X card cage before installing or removing accessory cards. The
following sections explain how to access the PCI-X card cage, and remove and install the accessory
cards.
Removing the PCI-X Card Cage Assembly
To remove the PCI-X card cage assembly, follow these steps:
1. If rack-mounted, extend the server out from the rack until it stops. See “Installing Components
When the Server Is in a Rack” (page 154).
Removing and Replacing the PCI-X Card Cage 167