
User Service Guide, Third Edition - HP Integrity cx2620 Server


NOTE: If the new PCI-X card has a slower capability than the current bus configuration,
it will not work. If the new card has a faster capability than the current bus configuration,
it only runs at the slower bus mode and frequency of the current bus configuration.
Removing a PCI-X Card
CAUTION: Observe all ESD safety precautions while performing this procedure. Failure to
follow ESD safety precautions can result in damage to the server.
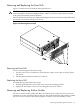
NOTE: You must remove the PCI-X card cage from the server chassis to access the PCI-X cards.
To remove a PCI-X card, follow these steps:
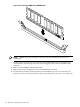
1. Remove the PCI-X card cage from the server chassis. See “Removing the PCI-X Card Cage
Assembly” (page 167).
2. Remove the cover from the PCI-X card cage.
3. If a cable blocks card removal, or if it is connected to the card, disconnect the cables from
the card connectors.
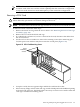
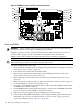
4. Use the ACX-15 Torx screwdriver to remove the retaining screws (M3 x 6mm long pan
T15/slot squire cone stainless steel) that secures the card in place (Figure 6-12).
Figure 6-12 PCI-X Card Retaining Screws
pciccscrw2
Card
Retaining
Screws
5. Grasp the card by the two opposite edges and lift the card from the socket.
6. If there are any empty sockets in the card cage, install a blank panel in the bulkhead opening
at the end of the card cage. The blank panel is necessary to ensure correct airflow when the
card cage is installed in a working server.
Removing and Replacing Hot-Pluggable PCI-X Cards 171