
User Service Guide, Third Edition - HP Integrity cx2620 Server


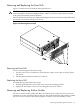
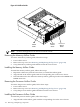
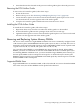


Figure 6-17 DIMM Connectors and Slots on the System Board
sysbrd1cpu
1B
5B
3B
1A
5A
3A
0B
4B
2B
0A
4A
2A
Removing DIMMs
WARNING! Ensure that the system is powered off and all power sources are disconnected
from the server prior to removing or installing server hardware.
Voltages are present at various locations within the server whenever a DC power source is
connected. This voltage is present even when the main power switch is turned off.
Failure to observe this warning can result in personal injury or damage to equipment.
CAUTION: Observe all ESD safety precautions while performing DIMM removal. Failure to
follow ESD safety precautions can result in damage to the server.
To remove a DIMM, follow these steps:
1. If rack-mounted, extend the server out from the rack until it stops. See “Installing Components
When the Server Is in a Rack” (page 154).
2. Power off the server. Disconnect all external cables.
3. Remove the server from the rack and place it on an ESD-protected work surface. See
“Removing the Server From a Rack” (page 155).
4. Remove the top cover from the chassis. See “Removing and Replacing the Top Cover”
(page 158).
5. Remove the memory airflow guide. See “Removing the Memory Airflow Guide” (page 176).
6. Locate the DIMMs you want to remove (Figure 6-17).
7. Press down on the DIMM socket retainer clips on either end of the DIMM connector until
the DIMM ejects from the connector.
8. Lift the DIMM from the system board socket (Figure 6-18). If the removed DIMM is functional,
store it for future use. Store DIMMs in static-free containers.
9. Repeat steps Step 6 through Step 8 for each DIMM you want to remove.
10. If you do not install DIMMs immediately, set the memory airflow guide in position and
reinstall the top cover. See “Installing the Memory Airflow Guide” (page 176), and to
“Removing and Replacing the Top Cover” (page 158).
178 Removing and Replacing Components