
User Service Guide, Third Edition - HP Integrity cx2620 Server


Removing and Replacing the LED Status Panel
Remove the LED status panel from the front of the chassis. It is mounted together with the
CD/DVD optical drive assembly.
WARNING! Ensure that the system is powered off and all power sources are disconnected
from the server prior to removing or installing server hardware.
Voltages are present at various locations within the server whenever a DC power source is
connected. This voltage is present even when the main power switch is turned off.
Failure to observe this warning can result in personal injury or damage to equipment.
CAUTION: Observe all ESD safety precautions while performing this procedure. Failure to
follow ESD safety precautions can result in damage to the server.
Removing the LED Status Panel
To remove the LED status panel, follow these steps:
1. Power off and disconnect system power. Disconnect power at the DC source end of the
power cables, using the disconnect device that is part of the rack or facility power system.
2. Remove the front grill. See “Removing and Replacing the Front Grill” (page 175).
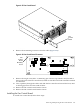
3. Remove the two noncaptive screws (M3 x 6mm long pan T15/slot square cone stainless steel)
that secure the CD/DVD deck and LED status panel assembly to the server chassis. Pull the
entire assembly from the chassis.
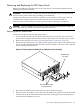
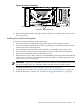
Figure 6-19 Removing the CD/DVD Deck and LED Status Panel Assembly
chasdvdxtnd
Deck/Panel Assembly
Mounting Screws
CD/DVD Deck
Assembly
4. Disconnect the cable from the small connector on the LED status panel.
5. Remove the two noncaptive screws that secure the LED status panel board to the threaded
standoffs on the deck, and slide the board forward to disengage the board lock apertures
from the keyed standoffs (two each).
Removing and Replacing the LED Status Panel 181