
User Service Guide, Third Edition - HP Integrity cx2620 Server


To access internal components, remove the top cover and follow these steps:
1. Turn off and disconnect the system power. Disconnect power at the DC source end of the
power cables, using the disconnect device that is part of the rack or facility power system.
2. Remove or loosen (as appropriate) the screws that fasten the server to the rack.
3. If the server is slide-mounted, slowly pull the chassis forward (or push from the rear) to
extend the chassis from the rack. The server is fully extended when the rail clips are locked
in place. If the server is tray-mounted, it is not held in the rack and can fall from its mounting.
Do not extend the server from the rack, remove it from the rack for internal access.
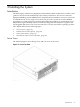
4. Remove the top cover. See “Removing the Top Cover” (page 64).
Removing the Server From a Rack
WARNING! The server can weigh as much as 22.7 kilograms (50 lbs.). Use caution when lifting
the server.
NOTE: Ensure there is enough area (approximately 1.5 meters [5 ft.]) to fully extend the server
from the front of the rack to work on it.
To remove the server from the rack, follow these steps:
1. Turn off and disconnect system power. Disconnect power at the DC source end of the power
cables, using the disconnect device that is part of the rack or facility power system.
2. Label and disconnect all cables from the unit rear panel connectors.
3. Remove or loosen (as appropriate) the screws that fasten the server to the rack.
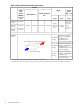
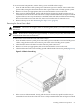
4. Label and disconnect the rack or facility ground cable from the chassis rear panel (Figure 3-4).
Figure 3-4 Chassis Ground Lug
5. If the server is slide-mounted, slowly pull the chassis forward (or push from the rear) to
extend the chassis from the rack. The server is fully extended when the rail clips are locked
Installing Additional Components 59