
User Service Guide, Third Edition - HP Integrity cx2620 Server

1. If required, stop the operating system. The OS does not support hot-plugging devices.
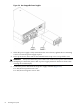
2. If a disk filler is installed, remove it by pulling the release lever.
3. With the release lever pulled out, slide a hot-pluggable hard disk into the disk slot until it
is seated.
4. Press the release lever until it is flush with the front of the server. The release lever clicks as
it locks into position.
5. If the operating system was stopped in step Step 1, reset the system to the EFI Boot
Maintenance Menu to rescan the hard drives.
6. If the operating system was stopped in step Step 1, use the EFI Shell map command to verify
that you correctly installed the newly inserted drive.
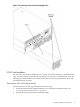
Installing Hot-Swappable Power Supply Units
The supported configuration of a server requires that two power supplies be installed. During
normal operations, the two power supplies share the load. Each provides power through a
separate power rail. A single power supply can provide all power needed for normal operations,
but a second power supply is installed to provide backup capability.
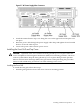
Hot-swappable power supplies 1 and 2 are located at the rear of the chassis. The power supplies
are identical and interchangeable.
NOTE: A hot-swappable device does not require interaction with the operating system before
the device is removed from or installed into the server. If the second power supply is functioning
correctly, you can power off and remove a power supply with no effect on server operations.
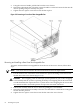
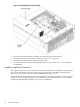
Installing a Hot-Swappable Power Supply
You can install a power supply while the server is installed in a rack.
To install a hot-swappable power supply, follow these steps:
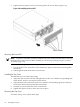
1. If rack-mounted, you may need to extend a slide-mounted server out from the rack for better
access. If necessary, slide the server out to the fully extended position.
2. Orient the power supply such that the securing screws are aligned with the corresponding
holes in the server chassis. Gently push the power supply into position.
Installing Additional Components 61