BackPak® H4.00 User Interface Client Installation HP Part Number: 748416-002 Published: March 2014 Edition: G06.24, H06.06 or J06.
Legal Notice © Copyright 2013 Hewlett-Packard Development Company, L.P. Confidential computer software. Valid license from HP required for possession, use or copying. Consistent with FAR 12.211 and 12.212, Commercial Computer Software, Computer Software Documentation, and Technical Data for Commercial Items are licensed to the U.S. Government under vendor’s standard commercial license. The information contained herein is subject to change without notice.
Table of Contents INTRODUCTION ......................................................................................................... 4 Installation steps .................................................................................................. 4 BackPak distribution package ................................................................................. 5 Acrobat reader setup for BackPak documentation ..................................................... 5 INSTALLATION REQUISITES .............
Introduction Introduction This guide documents the installation of the BackPak UI client on an operator workstation or on a BackPak VTC server. This manual applies to BackBox and BackLib products. The main manual of each product is BackBox User Manual and BackLib User Manual. Product error messages are documented in the common BackPak Troubleshooting and Messages Manual. The UI Client application can be installed on the various Windows current operating systems.
Introduction BackPak distribution package In the BackPak package that is common to BackBox and BackLib products, the following elements are needed. • • In the UI-vv.vv.vvvv directory sub-directory “32bits” or “64bits” depending on the target OS: o BackPakClientSetup[64].msi o Setup.exe In the Documentation directory, the overall installation guide must be consulted: o BackBox Installation Guide (or BackLib Installation Guide) for an initial installation.
Introduction 6 BackPak H4.
Install BackPak UI Client Installation requisites A user account with full local administrator right is required for the installation process. If the user account of the installation process will not be the same account use for application operation, make sure to select the “Everyone” option in the Select folder dialog box. For normal application operation, Javascript enabled and Popup Window enabled should be set as describe in the Internet Options section of this document.
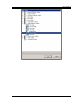
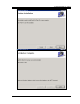
Install BackPak UI Client Figure 1 – UI Client installation images 8 BackPak H4.
Install BackPak UI Client Install for everyone is highly recommended, especially when installing in a VTC. 9 BackPak H4.
Install BackPak UI Client 10 BackPak H4.
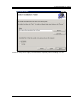
Install BackPak UI Client Missing Windows component It might happen the workstation Windows software components are not at the level required by the BackPak UI Client. In this case, the missing component or component version is identified in a pop-up windows such as the one below, and the component is fetched from Internet. Figure 2 – Missing Windows component example Follow the instructions to install the upgrade from internet.
Install BackPak UI Client UI Preferences UI client preferences can be set by the menu Preference. Session timeout configuration User Interface sessions automatically time out after 20 minutes of inactivity. To set a different timeout, select Preference, Session; this window will open. Figure 3 – UI Client – Session Timeout 12 BackPak H4.
Install BackPak UI Client Internet Options This opens the standard IE Internet Options page. The BackPak UI requires usage of Scripting applet and Pop-up windows. Those options need to be set for each user account that will run the BackPak UI. In some restricted environment, user operating the BackPak UI may not be able to change IE Internet Options. In such case, ask the local administrator to apply change to the user account.
Install BackPak UI Client Scripting settings In the Security tab, select the Local intranet zone and click on the Custom level… The dialog box Security settings will appear. Scroll down up to the Scripting section and activate all 3 options. Figure 5 – UI Client – IE Scripting settings 14 BackPak H4.
Install BackPak UI Client Register the domain address The domain address is a TCPIP address and port of the BackPak domain manager to reach, as configured to the NonStop Guardian TCPIP LISTNER in PORTCONF file. Refer to the BackPak NonStop Installation guide. For the UI Client, this address is a kind of bookmark that simplifies the login to the BackPak domain manager for future configuration or operation.
Install BackPak UI Client 2. In the upper menu, click “Domain Address Configuration” to display the tab where the domain address is to be registered. Figure 7 – UI Client - Empty Domain address page 3. Click on the Add Domain Figure 8 – UI Client - Sample Domain address page Domain name: Enter the domain identifier. This identifier must be identical to the domain name that will be entered in the BackPak domain configuration.
Install BackPak UI Client Log VT Controller messages on this Domain: Leave checked for a first installation. This parameter has no consequence for a UI Client installed on the operator workstation. For a VTC, check the box to have the messages of general interest (such as “Virtual Tape Device started”) initiated by the VTC propagated to the EMS subsystem of the NonStop running the Domain Manager.
Install BackPak UI Client Un-Install / Upgrade BackPak UI Client To upgrade, the BackPak UI client must be un-installed and re-installed. The UI client is un-installed in the regular Microsoft Control Panel, by the “Add or Remove Programs” page. Search for “BackPak UI Client”. During the un-install, a pop-up will propose to keep or delete the configuration associated to the BackPak UI client on the local machine. Click “Yes” to keep the Domain addresses and the customized timeout.