
DNS Configuration and Management Manual (G06.27+, H06.05+, J06.03+)


DNS Configuration on the NonStop Server
HP DNS Configuration and Management Manual—529432-003
3-21
Use Public Key Cryptography: DNSSEC
servers have enough memory to load the new, larger zones. If your name servers are
resolving more records in secure zones, make sure they have enough processor
power to verify all those digital signatures and remember that BIND 9 can take
advantage of any processors you can add to the host it runs on.
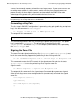
Generating a Key Pair
The first step in DNSSEC configuration is generating a key pair (public key and private
key). Use the command
dnssec-keygen:
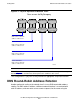
$> -keygen -a RSA -b 512 -n ZONE myzone.com.
The output for this command is:
The command generates two files containing the public and private keys. The public
key is contained in
output.key. The private key is contained in the file
output.private and where output is the output (shown above) that is printed by
the
dnssec-keygen tool.
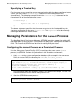
Signing the Zone File
The zone file to be signed and the key files (output.key and output.private) must
be in the same directory. Append the public key to the existing zone file:
$> cat "$INCLUDE Kmyzone.com.+001+27791.key" >> db.myzone.com
This command creates the KEY records in the signed zone file and also instructs
dnssec-signzone to use the private key file to sign the zone file.
Sign the zone:
$> dnssec-signzone -o myzone.com db.myzone.com
The output of this command is the signed zone file named db.myzone.com.signed.
Alter the existing name server configuration file (named.conf) to include the signed
zone file:
zone "myzone.com" in {
type master;
file "db.myzone.com.signed";
};
Note. The trusted-keys statement in the BIND 9 configuration file syntax is used to configure
the public keys of security roots for use in DNSSEC.
Kmyzone.com.+001+27791