
iTP Secure WebServer System Administrators Guide (Version 7.5+)
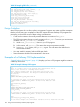


insert into =dbaccess values ("/WEB","net.myco.com",80,"$ztc2",1,2);
insert into =dbaccess values ("/Images","net.myco.com",80,"$ztc2",1,1);
insert into =dbaccess values ("/samples","172.16.10.22",3366,"$ztc0",1,0);
insert into =dbaccess values ("/index.html","172.16.10.22”,3366,"$ztc0",1,3);
insert into =dbaccess values ("/MlplSrvs","172.16.10.22",3376,"$ztc0",2,4);
insert into =dbaccess values ("/MlplSrvs","172.16.10.22",3366,"$ztc0",2,5);
Modifying the Database
When you build and install RLS as described in “Building and Installing the Resource Locator
Service (RLS)” (page 169), the make utility loads the database with the data in dbload.sqlci, but
you do not have to reinstall RLS to make changes later. In fact, an administrator should periodically
review and update the database to check that it reflects any changes in Web-server configurations.
To update the database without changing the locations of the database files:
1. Update the dbload.sqlci file.
2. Use the NonStop TS/MP PATHCOM utility to stop the RLS server class.
3. Return to the OSS environment and issue the command make dbload to load your new data
into the DBACCESS table.
4. Use the PATHCOM utility to start the RLS server class.
To change the location of the database:
1. Stop the iTP Secure WebServer environment.
2. Issue the rm command in OSS to remove the file rmt.pway.
3. Issue the command make dbdelete to delete the existing database.
4. Change the values of DB_VOLUME and DB_SUBVOLUME in the make file. The database files
will be created in the Guardian volume and subvolume you specify.
5. Issue the command make to create a new rmt.pway and a new database.
6. Restart the iTP Secure WebServer environment.
Building and Installing the Resource Locator Service (RLS)
To build and install RLS in the OSS environment:
1. Navigate to the RLS directory, using the command cd /bin/rmt.
2. If you want to create the database in a directory other than $SYSTEM.ZWEB, change the
values of DB_VOLUME and DB_SUBVOLUME in the make file.
The database must be located on a volume audited by TMF.
3. Enter descriptions of your Web servers by editing the file dbload.sqlci, if you have not
already done so.
4. Run the make utility. This step installs the database and compiles and links the object code
into the executable rmt.pway.
5. To install RLS in a different directory, move rmt.pway by using the following command:
mv rmt.pway directory
specifying the desired directory. Do not copy rmt.pway; executable programs that contain
SQL queries do not work if you copy them.
6. Navigate to the configuration directory, using the command cd /admin/conf.
7. Run the installation script using ./install.WS if your iTP Secure WebServer environment
is not already installed.
8. Modify the httpd.config file if you must change the RLS configuration. You must modify
the httpd.config file if you moved rmt.pway.
9. Start the iTP Secure WebServer environment. Use ./start if you just installed the iTP Secure
WebServer or ./restart if the iTP Secure WebServer was already running.
Building and Installing the Resource Locator Service (RLS) 169