
M8609A Tabletop Tape Drive Installation and User's Guide (H06.14+, J06.03+)


M8609A Tabletop Tape Drive Installation and User’s Guide—546013-001
3-1
3 Operating the Tape Drive
This section includes:
Checking Operation
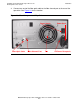
To power on the tape drive, refer to Step 7 on page 2-4. The tape drive will run its
hardware self-test, which takes about five seconds. If the self-test passes, the green
Ready LED flashes and then shows steady green. If the test fails, the Drive Error and
Tape Error LEDs flash, while the Ready and Clean LEDs are off. This continues until
the tape drive is reset. See Front Panel LEDs on page 3-4 for more information about
the LEDs.
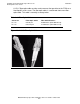
Loading a Tape Cartridge
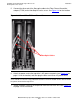
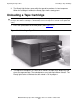
1. Insert a tape cartridge into the front slot of the tape drive with the front arrow
pointing toward the slot. (See Figure 3-1.) Apply gentle pressure until the tape
drive takes the cartridge and loads it.
Checking Operation 3-1
Loading a Tape Cartridge 3-1
Unloading a Tape Cartridge 3-2
Front Panel LEDs 3-4
Cartridge Information 3-5
Figure 3-1. Inserting a Tape Cartridge