
NonStop Development Environment for Eclipse 4.0 Debugging Supplement
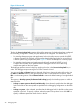

3. If you want to change the name of this configuration, enter the new name in the Name: box.
4. Make the modifications you want in each of the tabs. When you finish entering the information
for each tab, click Apply to apply your changes or Revert to revert to the settings in effect the
last time changes were applied, or go on to the next tab and click Apply when you are ready
to apply your changes to all tabs. If the Debug button is available and you click Debug, your
changes are applied before the debugger is launched.
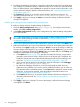
a. In the Main tab, specify the NonStop launch type, project name (optional), system and
user name, and the process. If the launch type is modified, also modify the remote path
map (if specified) by deleting the old entry and adding a new entry. See “Creating a
new NonStop Attach Process debug configuration” (page 20).
b. If you want to specify options for the debugger, enter the information in the Debugger
tab. See “Specifying debugger options” (page 30).
c. By default, the debugger searches for source files at the path recorded when the
application was compiled. If you need to specify a different location, such as when you
have moved the files to a different system, use the Source tab to specify the current location
of the files. A rule must be specified, either the default or alternate locations. See
“Specifying alternate source file locations” (page 27).
d. The Common tab allows you to set other options related to the Eclipse workspace. For
information about this tab, see “Common tab for NonStop debug configurations”
(page 48).
e. If you have not already done so for each tab, click Apply to apply your changes. To
revert to the settings in effect the last time changes were applied, click Revert.
Related topics
Related tasks:
• “Detaching the debugger from a NonStop process” (page 11)
• “Ending a debugging session” (page 38)
• “Creating or modifying debug configurations” (page 12)
Related reference topics:
• “Debug configurations dialog for NonStop debugging configurations” (page 40)
NonStop Snapshot debug configurations
Creating a new NonStop Snapshot debug configuration
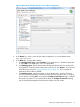
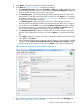
1. Open the Debug Configurations dialog. For example, from the main toolbar, select Run→Debug
configurations.
2. The list in the left side of the Debug Configurations dialog shows the types of debug
configurations you can create in addition to the names of debug configurations that have
already been created in this workspace. In this list, double-click the NonStop Snapshot
configuration type. A new debug configuration appears below the debug configuration type
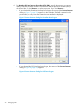
with the default name New_configuration. In the next steps in this procedure, use the tabs
on the right side of the Debug Configurations dialog (see Figure 9 (page 25)) to edit your new
configuration. When you finish entering the information for each tab, click Apply to apply
your changes or Revert to revert to the settings in effect the last time changes were applied,
or go on to the next tab and click Apply when you are ready to apply your changes to all
tabs. If the Debug button is available and you click Debug, your changes are applied before
the debugger is launched.
TIP: If you already have configured another NonStop Snapshot debug configuration, you
can copy it and modify the copy to create your new NonStop Snapshot debug configuration.
However, that debug configuration must already have the correct launch type.
24 Debugging tasks