
NonStop Development Environment for Eclipse Debugging Supplement

TIP: If you already have configured another NonStop Snapshot debug configuration, you
can copy it and modify the copy to create your new NonStop Snapshot debug configuration.
3. In the Name: box, type a name for this debug configuration.
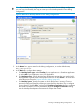
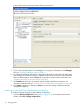
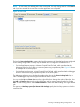
4. In the Main tab (Figure 9 (page 26)), configure these settings:
a. For NonStop launch type: select either Guardian or OSS. Your selection determines what
types of remote paths are allowed in all the tabs of the Debug Configuration dialog and
all of the dialogs related to browsing the remote system.
b. For NonStop project:, specify the NonStop development project that was used to build
the application. Type the name of the project in the box or click Browse... to locate and
select the project using the “Project Selection dialog” (page 42) dialog.
c. For NonStop system:, specify the system on which to run the debugger. Choose a
previously-configured system by selecting a system from the drop-down list, or configure
a new system by clicking Edit... and using the Configure Connections dialog to configure
the remote connection. For more information about the Configure Connections dialog,
see the NonStop Development Environment for Eclipse User Guide.
d. For NonStop snapshot file: specify the snapshot file you want to debug by typing the full
path to the snapshot file in the box or by clicking Browse... to locate and select the file.
e. Click Apply to apply your changes. To revert to the settings in effect the last time changes
were applied, click Revert.
f. If the executable for the program is not in the same location as it was when the snapshot
was taken, select Location of executable (if moved since snapshot was created): and type
the full path to the executable in the box or click Browse... to locate and select the file.
Creating or Modifying Debug Configurations 25