
NonStop SOAP 4.1 User's Manual


Setting up the Deployment Environment
After NonStop SOAP is installed, you must create at least one NonStop SOAP deployment
environment by running the NonStop SOAP deployment script. The deployment script will create
a new NonStop SOAP deployment under the iTP WebServer you choose, and install the echo
sample service and echo client. You can deploy multiple instances of NonStop SOAP on the same
NonStop system. Multiple instances of NonStop SOAP can be deployed under different iTP
WebServers or under the same iTP WebServer.
For more information see “Setting up Multiple NonStop SOAP Deployment Instances in a Single
iTP WebServer” (page 43).
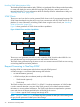
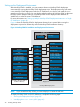
Figure 6 shows the NonStop SOAP 4 deployment directory that is created after running the
deployment script and its relationship with the NonStop SOAP Installation directory.
Figure 6 NonStop SOAP 4 Installation and Deployment Environment
/logs
/client
/client/echo
/services
/services/echo
deploy_instructions
/include
/lib
/modules/rampart/
/modules/transaction/
/modules/validation/
/modules/encoding/
/bin/
axis2cgi.pway
itp_axis2.config
axis2.xml
create
copy
softlink
softlink
softlink
softlink
create
create
create
create
axis2.xml
/bin/
axis2cgi.pway
/lib
/include
/sample_services
/tools
/bin/deploy.sh
Installation NonStop SOAP 4
Installation Directory
Deployment
NonStop SOAP 4 Deployment
local.config
iTP Web Server
create/update
/modules/rampart/
/modules/transaction/
/modules/validation/
/modules/encoding/
NOTE: If you reinstall NonStop SOAP, you must redeploy it to create the soft links.
To deploy NonStop SOAP on the iTP WebServer, complete the following steps:
• “Running the Deployment Script” (page 39)
• “Modifying the local.config file” (page 41)
38 Installing NonStop SOAP