NONSTOP SPAM
Part Number 546079-002 Abstract This guide describes the installation of the NonStop SPAM, which includes all the PC based (Windows) components. Supported Release Version Updates (RVUs) This publication supports J06.03 and all subsequent J-series RVUs, H06.10 and all subsequent H-series RVUs, until otherwise indicated by a replacement publication. Product Version NonStop SPAM T0814 H01^AAD Document History Part Number 546079-002 546079-001 Guide Revision Version 1.2 Version 1.
Table of Contents CHAPTER 1 1.1 1.2 1.3 1.4 1.5 1.6 Overview…………………………………………….…………………………………….………………4 Introduction……………………………………………………………………………...………………4 NonStop SPAM Architecture….…….………………………………………….………..………4 System Requirements…………………………………………………………….………..……..…5 Technical Support………………………………………………………………….……..……………6 What’s new? ………………………………………………………………………………....……...…6 User Guide………………………………………………..……………………..….……..………….…6 CHAPTER 2 2.1 2.2 2.3 2.3.1 2.3.2 2.3.3 2.4 INSTALLATION………………………………………………..…………….
.5.5 MANAGE CONFIGURATION – USER INFORMATION TAB …………………………….37 CHAPTER 5 EXCEL CONFIGURATIONS………………..………………………………………………….…….39 CHAPTER 6 UNINSTALLATION OF PC COMPONENTS………………..……………..………………….40 CHAPTER 7 7.1 APPENDIX …………………………………………………………………………………………………41 PARAMETER DETAILS ....................................................................................41 NonStop SPAM – Version 1.
CHAPTER 1: OVERVIEW _____________________________________________________________________________ 1.1 INTRODUCTION This document explains the working of the NonStop SPAM application. SPAM is an acronym for System Performance Analyses using Measure. It first explains the architecture of the product and the installation overview for the NonStop Monitor and the PC components.
The client is the entry point for the application, and the interface between the user and the NonStop Server(s). The users will use the client to connect to the NonStop Server to load the Measure files and is also responsible for monitoring the loading activities on one or more NonStop Servers as well as for downloading the consolidated file from the NonStop Server and loading data into the SQL database.
The PC or Server used for NonStop SPAM must have NonStop Server connectivity and properly defined credentials to enable loading of data. Further details on how to configure the SQL Server database are available on the SQL Server Connection(s) Tab of the NonStop SPAM Help as well as the SQL Server Express Configuration section below. The User must refer to this section to configure SQL Express to work with NonStop SPAM.
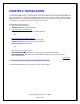
CHAPTER 2: INSTALLATION _____________________________________________________________________________ The NonStop SPAM Installer is a self-extracting Install Shield Wizard that contains NonStop SPAM and the host components. The following Windows components will need to be present before NonStop SPAM Installation. The installation of NonStop SPAM Installer alone will take 5 to 10 minutes depending on the OS with an additional ten minutes to register and activate. Windows Required Components: 1. Microsoft .
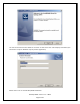
The next screen will have text fields for the Users to enter their User and Company information (this information is only for Windows only not product registration). Please click on ‘Yes’ to start NonStop SPAM installation. NonStop SPAM – Version 1.
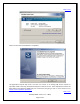
Back to TOC Click on ‘Finish’ after the installation is completed. The application requires SQL Server. The User can connect to an existing SQL Server instance or optionally install a local copy of SQL Server Express on the PC for free. If the SQL Express install is the data platform that NonStop SPAM and your environment are going to rely on, then continue on to Section 2.3 for installation procedures. Back to TOC NonStop SPAM – Version 1.
2.2 INSTALLATION OF NONSTOP MONITOR The NonStop SPAM Installer self-extracts the host components to the location C:\Program Files (x86)\Hewlett-Packard\NonStop SPAM\NonStop SPAM Host Components. 1) The installation of the host components is carried out by transferring the following files to the NonStop.
c. PARAM COMPRESS-UWS-FILE-FOR-FTP This is an optional parameter. This PARAM allows the compression of UWS files during the FTP process. NOTE: The default is set to ‘NO’; the user should set it to ‘YES’ to allow the compression of UWS files during the FTP process. 4) Open the ‘STRTNSM’ file in Edit block mode, the user needs to set the following basic options. a. PARAM COMPRESS-UWS-FILE-FOR-FTP This is an optional parameter. This PARAM is allows the compression of UWS files during the FTP process.
Click the Microsoft SQL Server 2005 Setup and check the “I accept…” box after it has been read through. Throughout the installation of SQL Server Express, simply use the default options that show up on the various steps of installation (except for Authentication Mode). Click Next to proceed with the defaults. NonStop SPAM – Version 1.
The Message screen column will rarely contain Errors or Warnings. Please configure your SQL Server regardless before contacting hp’s 'Global NonStop Solutions Center' (GNSC). This includes APS.NET and Minimum Hardware Requirements. Back to TOC NonStop SPAM – Version 1.
There is only one screen where one needs to be extra careful. This is the “Authentication Mode” screen, where one selects the authentication mode for your Server. The default is Windows Authentication, but “Mixed Mode” authentication should be selected. Specify a password here for the “sa” SQL account (e.g. “Authentication”), which will be required to connect to the database from the NonStop SPAM application. Then proceed to select the defaults. NonStop SPAM – Version 1.
Click on ‘Install’ to start the installation process. Proceed until the installation process is finished. NonStop SPAM – Version 1.
Now please continue the SQL Server setup and TCP/IP configuration with Section 2.4 Windows 7: The SQL Server 2005 Express SP3 will install for Windows 7. Windows 7 may require slightly different steps e.g. Windows 7 security pop-ups. Back to TOC 2.3.2 SQL SERVER 2008 R2 EXPRESS WALKTHROUGH The following is a walkthrough for the NonStop SPAM application’s use with Microsoft SQL Server 2008 R2 - Express. These settings are strongly recommended.
Check the “I accept…” box after it has been read through. Click Next to proceed with the defaults. NonStop SPAM – Version 1.
The Default instance is selected here for the purpose of this Walkthrough. During the Instance Configuration you can select either. Configure the Account name as NT AUTHORITY\NETWORK SERVICE for SQL Server Database Engine. Configure Automatic Startup Type for both SQL Server Database Engine and SQL Server Browser. NonStop SPAM – Version 1.
Select Mixed Mode (SQL Server authentication and Windows authentication). Use any password. Click on Close when the installation has finished. Now please continue the SQL Server setup and TCP/IP configuration with Section 2.4. Back to TOC 2.3.3 SQL SERVER 2012 EXPRESS WALKTHROUGH The following is a walkthrough for the NonStop SPAM application’s use with Microsoft SQL Server 2012 Express. These settings are strongly recommended. NonStop SPAM – Version 1.
NOTE: For customers installing SQL server 2012 express, it is recommended to download and install the ‘Microsoft SQL Server 2005 Backward Compatibility’ patch to support SQL server 2012 If a SQL Server 2012 Express is used there is a 10GB limitation for each individual Database used in NonStop SPAM. However, NonStop SPAM will automatically route data into new databases and assign a sequential number to it in the NonStop SPAM Calendar.
The Default instance is selected here for the purpose of this Walkthrough. During the Instance Configuration you can select either Configure the Account name as NT AUTHORITY\NETWORK SERVICE for SQL Server Database Engine. Configure Automatic Startup Type for both SQL Server Database Engine and SQL Server Browser. NonStop SPAM – Version 1.
Select Mixed Mode (SQL Server authentication and Windows authentication). Use any password. Click on Close when the installation has finished. NonStop SPAM – Version 1.
Now please continue the SQL Server setup and TCP/IP configuration with Section 2.4. Back to TOC 2.4 SQL SERVER EXPRESS CONFIGURATIONS The NonStop SPAM application requires an instance of a Microsoft SQL Server to connect to. This can be any SQL Server on the User’s network or local PC. Once the SQL Server Express is installed, the User should modify the network configuration so that User can connect with the NonStop SPAM application. The configuration process will take less than one minute to complete.
B. Under SQL Server 2005 Network Configuration -> Protocols for SQLEXPRESS, right-click on TCP/IP and Enable it. C. Click OK. Double-click on “TCP/IP”, and go to the “IP Addresses tab”. Make sure that the Enabled value for “IP1”, “IP2”, etc. is set to “No”. Under “IP All” (i.e. usually the last entry), alter TCP Dynamic Ports to a blank field and TCP Port to “1444”: NonStop SPAM – Version 1.
Apply the changes by clicking on the “Apply” button. D. In order for the changes to take effect, the User must restart the services. For this, select “Select Server 2005 Services” from the left hand panel, right-click on the “SQL Server (SQLEXPRESS)” service and select “Restart”. E. Close the SQL Server Configuration Manager.
CHAPTER 3: NONSTOP SPAM SET UP AND LICENSING _________________________________________________________________________ 3.1 NONSTOP SPAM SETUP To launch and start using NonStop SPAM, Double click on the NonStop SPAM icon on the desktop (OR) Click on the Start menu; All Programs -> Hewlett Packard -> NonStop SPAM -> NonStop SPAM. The very first time NonStop SPAM is launched, the following registration form will show up: Fill in the SQL Server information.
The product requires registration which will trigger generation of a license and instructions for product component activation. Fill in contact and company details along with the NonStop System information (registration requires NonStop node connectivity). Please click the “Verify NonStop Server Connection” button first. The “Listening Port” field will be the port configured during the NonStop Monitor installation (For example on an H-Series RVU H06.23.
3.2 NONSTOP SPAM LICENSING NonStop SPAM clients require a valid license before data can be analyzed. If the client PC has Internet access the licensing process activates NonStop automatically. If the PC does not have Internet access then the User needs to provide the Publisher with details to obtain a manual license via E-mail. In both scenarios the User will be required to complete a registration transmission with User Information.
CHAPTER 4: USING NONSTOP SPAM __________________________________________________________________________ 4.1 STARTING NONSTOP SPAM NonStop SPAM has server and client components. The server services need to be started up before the NonStop SPAM features can be accessed via the client component. 4.1.1 SERVER SERVICES The server services are started by obeying the STRTNSM file present in the NonStop Monitor installation subvolume (obey STRTNSM).
4.3 LOAD EXISTING MEAURE COLLECTIONS NonStop SPAM allows the user to load an existing System Measure collection. Clicking on the brings up a window where the user confirms the load process to the SQL database. Icon Once the file has been submitted for processing, the “Status” tab of the Load window displays the transaction details. This grid lists current and previously submitted jobs and their statuses. Each entry in this grid lists: From: Starting Date and Time of collection.
There are two icons next to each entry. The (delete) button is used to delete the processed measure collections. The (reload) button is to attempt a reload of the file in case of a failure earlier or to reload data deleted from the database.
analyze. Once the time range is selected, the user needs to check a Module box, click on the “Analyze” button, and view the reports generated by the NonStop module. Data for System Panel Field Select Database DB Information Year From Date From Hours From Minutes Thru Date Thru Hours Thru Minutes Description All: Displays the dates for the available data. Only: Displays dates that have data for the selected entity. Displays multiple databases available. Provides the Database’s detail information.
generation process. As soon as the reports/charts are ready, they can be viewed in the report viewer by clicking on the ‘View Report’ button. The user can save the current selected reports and charts as a template. If template exists it will be replaced. Whenever the saved template is selected in order to generate reports/charts, the check boxes for reports/charts will be automatically populated and the reports can be generated by clicking on the ‘Generate’ button.
4.5 MANAGE CONFIGURATION 4.5.1 INTRODUCTION (MANAGE CONFIGURATION) The “Manage” screen provides the users an option to manage previously loaded data, as well as manage configurations, including the connections to the configured ‘NonStop Server(s)’, ‘local database(s)’ and ‘User Information’. 4.5.2 MANAGE CONFIGURATION - DATA MANAGEMENT TAB The user is provided with an option to delete the loaded measure collections through the Manage section.
IP address or DNS name and Port number for SQL server connection. This list gets generated dynamically and pre-selects the one set as SQL Server current connection. Ex: 123.123.123.123,19500 (or) localhost,19500 Authentication Type of password authentication to be used. Enter the login name which is defined during your SQL database Login administrator setup. Enter the password which is defined during your SQL database Password administrator setup.
4.5.4.2 MANAGE CONFIGURATION - EDIT NONSTOP SERVER CONNECTION(S) TAB This section gives the users the ability to enable/disable the secure mode for an existing NonStop connection. In order to enable the secure mode in NonStop SPAM, users need to edit the NonStop server configurations.
** IMPORTANT NOTE ** THE NONSTOP SYSTEM SERIAL NUMBER MUST BE EXACT (including leading zeroes). It is recommended that you use SYSINFO or an equivalent to verify that you have the exact system serial number before attempting the install and registration process. If you have licensing issues then contact Performancemanagement@hp.com for assistance. Back to TOC 4.5.
HP Rep Email [OK] Hewlett Packard’s Representative Email Address. “OK” button, modifies and existing User’s information. NOTE: There is a check box connected to the information provided “Notify me of Estimated Space Required During Load”. Back to TOC NonStop SPAM – Version 1.
CHAPTER 5: EXCEL CONFIGURATIONS ________________________________________________________________________ In order to generate NSR reports, the Microsoft Excel settings need ‘Macro Security’ configured with a check mark on ‘Trust access to the VBA project object model’. Please ensure that the recommended settings are made before generating the reports. Refer to the instructions below to enable the Macro’s, depending on the Microsoft Office version installed on your PC.
CHAPTER 6: UNINSTALLATION INSTRUCTIONS – PC COMPONENTS _____________________________________________________________________________ This section explains how to uninstall NonStop SPAM. For a detailed removal i.e. a User wanting a clean slate these are the steps: 1. Go to Start, Control Panel, Add or Remove Programs 2.
CHAPTER 7: APPENDIX _____________________________________________________________________________ 7.1 PARAMETER DETAILS The parameters are: ALLOW If a Measurement is started when processes are already running, and their files are already open, MEASURE may record the DISCOPEN or FILE entities BEFORE recording the PROCESS entities; this effect can be significant on a busy system with many entities under measurement.
Use this parameter to specify the time of day, in 24-hour clock format (HH:MM), at which the first timeline interval is to begin. This time of day is assumed to be on the day on which the measurement was started. NOTE: Values range from 00:00 to 23:59; the default value is 00:00, which causes these reports to align the first interval with the start of the report window.
INTERVAL The "New Process Creation Timeline" and "Process Existence Timeline" reports show the user new process creations and process existence, respectively, during intervals within the overall measurement "window". These reports show 16 equal-sized intervals within the window. Use this parameter, in conjunction with the BEGIN parameter, to "zoom in" on a shorter time period within the measurement window. Use this parameter to specify the interval size, in minutes.
NEEDLE The "Low Selectivity SQL Table Access" report is intended to show the openers of files (NonStop SQL Tables) whose accesses exhibit low selectivity; that is, relatively small values for the records used to records accessed ratio. Use this parameter to specify the selectivity threshold; the unit of measure is records used as a percentage of records accessed.