
NonStop SPAM User Guide


NonStop SPAM – Version 1.2 – T0814
Page 34 of 44
4.5 MANAGE CONFIGURATION
4.5.1 INTRODUCTION (MANAGE CONFIGURATION)
The “Manage” screen provides the users an option to manage previously loaded data, as well as manage
configurations, including the connections to the configured ‘NonStop Server(s)’, ‘local database(s)’ and
‘User Information’.
4.5.2 MANAGE CONFIGURATION - DATA MANAGEMENT TAB
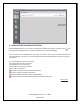
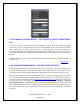
The user is provided with an option to delete the loaded measure collections through the Manage
section. The “Calendar Grid” highlights the days for which data is available, shown as dark gray Dates. To
delete the loaded measure collections from the SQL server Database, the user needs to select the date
from the ‘From’ and ‘To’ dropdown and click on the Delete button.
Once the request is submitted, all the associated measure files are deleted from the database. However,
the processed measure collections will be available in the ‘Load’ section and can be reloaded to the SQL
server any time.
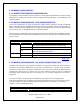
Data Management Tab
Panel
Field
Description
Calendar:
Entity
All: displays all data available.
Only: displays dates that have data for the selected entity
DB Information
Database’s detail information.
Year
Year to display data for. It gets generated dynamically with all
year(s) of data available to system.
Delete:
From Date
Starting Date of analysis.
To Date
Ending Date of analysis.
Back to TOC
4.5.3 MANAGE CONFIGURATION - SQL SERVER CONNECTION(S) TAB
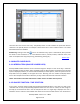
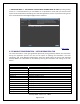
The SQL Server connection can be added or modified. It is important to specify the correct connection
information since NonStop SPAM stores all the data in a SQL Database. The SQL Server connection
information is in the form of “IP address or DNS name, port”. Users may provide an IP Address,port (or)
Localhost,port. SQL server has a default port but many companies choose to alter this. Additional
information about installing SQL Server and making sure it is correctly configured can be found in
Chapter 2.3.
The server connection properties and the database to use on that server are configured here.
After entering the DNS name or address, user name and password fields, click on the “Connect” button
to verify connection. To get your DNS name (PC name), go to Start-- > Programs-- > Accessories-- >
System-- > Tools-- > System Information.
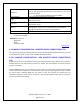
SQL Server Connection(s) Tab
Field
Description