
ODBC/MX Driver for Windows Manual for SQL/MX Release 3.1 (H06.23+, J06.12+)

Installation of the ODBC/MX Client
HP NonStop ODBC/MX Driver for Windows for SQL/MX Release 3.1—663858-001
2-3
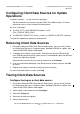
Step 3: Add a Data Source
Step 3: Add a Data Source
Follow the steps in Adding New Client Data Sources on page 3-1 to add the data
sources needed to support the ODBC applications on the client workstation.
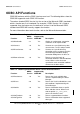
Screen Button Description
Welcome Next
Cancel
License Agreement Yes
No
Displays the next screen
Aborts the installation
Choose Destination
Location
Browse Selects the folder into which the ODBC files are copied.
The default location is:
C:\.....\Hewlett-Packard\NonStop ODBCMX 3.x
Select Program
Folder
Enter the name of a subfolder within the Program folder.
The default is NonStop ODBCMX 3.x.
The InstallShield then installs the client interface
components.
Start Copying Files Back
Next
Cancel
Displays a summary of installed components.
Question Yes
No
If data sources configured for a previous version of
ODBC/MX are found, this screen is displayed.
Click Yes to reconfigure all data sources for the current
version of MXCS. Clicking No leaves data source
configuration unchanged.
Question Yes
No
If HTML Help has not been found on the system, this
screen is displayed. Click Yes to install HTML help. The
HTML Help installer will run after installation of the
ODBC/MX Client is complete.
InstallShield
Wizard Complete
Finish To complete the installation, select the following options
and click Finish:
I would like to view the README file.
I would like to add a new ODBC/MX data source
now—this option starts the ODBC Data Source
Administrator. Performs the installation cleanup, exits
the installation, and performs the selected tasks.
Reboot Required Yes
No
This screen displays only if rebooting your system is
required. Click Yes to automatically reboot your system
now. If you click No, you must reboot your system in
order for the installation to complete.