
ODBC/MX Driver for Windows Manual for SQL/MX Release 3.1 (H06.23+, J06.12+)

Installation of the ODBC/MX Client
HP NonStop ODBC/MX Driver for Windows for SQL/MX Release 3.1—663858-001
2-4
Step 4: Delete the Installation Folder
Step 4: Delete the Installation Folder
When the installation is complete, delete the temporary installation folder you created
in Step 1.
Step 5: Restart the PC
HP recommends that you restart the PC before you use the ODBC/MX client interface.
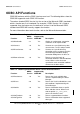
ODBC/MX Driver Component
After installing the ODBCMX 3.x, the following ODBC/MX driver DLLs are installed in
system 32:
Uninstalling the Client Interface
You can uninstall the client interface using one of the following two ways.
Select Start, Programs, NonStop ODBCMX 3.x, Remove NonStop(TM) ODBCMX
3.x. Click Yes to uninstall ODBC/MX; click No to cancel the uninstallation.
Run the TDMODBC.EXE or NSODBC64.EXE program and select Uninstall.
The uninstall operation deletes the ODBC/MX driver, but it does not delete the driver
manager or any data sources. However, you cannot use these data sources until you
reinstall the ODBC/MX driver.
Note. Before using the client interface, the MXCS service must be started. For information on
how to start the service, see the SQL/MX Connectivity Service Manual.
File Name Description
tdm_oadm0300.dll NonStop ODBC/MX Client Adminstration DLL
tdm_odbc0300.dll NonStop ODBC/MX Driver DLL
tdm_odbcDrvMsg_intl0300.dll NonStop ODBC/MX Client Msg DLL
tdm_OdbcTrace0300.dll NonStop ODBC/MX Client Trace DLL
tdm_ores0300.dll NonStop ODBC/MX Driver Resource DLL
tdm_tcpipv40300.dll NonStop ODBC/MX TCPIPV4 DLL
tdm_tcpipv60300.dll NonStop ODBC/MX TCPIPV6 DLL
tdm_translation.dll. NonStop ODBC/MX Translation DLL