
OVNM 5.3 - Operations Agent for NonStop ObjectMap Guide


Working with ObjectMAP 37
3. Select the object you want to add to the map. In order to view only selected object types click on the plus
sign next to the subsystem and select individual object types. This will add only the selected object type to
the map.
4. Click on the Add to MAP button to add the selected object(s) to the map window.
5. Repeat the steps 2, 3 and 4 to add more objects to the object file.
NOTE: If the view is locked then the user cannot add objects to the view. The view needs to be unlocked
before objects are added to the object file.
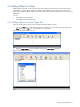
6. The next step is to save the objects to a file. Select the Save objects option in the File menu to save the
mapped objects. The Save As dialog box is displayed. You can specify the path where the file is to be
saved along with the file name. You can also use the Save objects to a file option in the File menu to save
the objects.
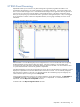
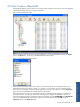
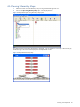
Figure 4-6 ObjectMAP Window
NOTE: While saving objects in a file, the current View Type information is also saved. This will be restored
when the file is opened.
NOTE: If the user does not save changes to the object file, then ObjectMAP prompts the user to save the file
before quitting the application or moving on to a different object file map. A dialog box is displayed asking
the user to Save changes to Untitled file.
NOTE: When a previously saved file is opened, a dialog box is displayed, warning you that the object status
values are not in-sync with the current state of the object. The values are not updated until a state change is
detected. To update the file with the current object state use the Synchronize option in the right-click menu of
the Object Class pane..
Working with ObjectMAP