
RDF System Management Manual for J-series and H-series RVUs (RDF 1.10)


database. In this particular case, the database is not corrupted, but data corruption could happen
for other NonStop SQL/MP or NonStop SQL/MX DDL SHARED ACCESS operations.
If you did recently perform a NonStop SQL/MP or NonStop SQL/MX operation with SHARED
ACCESS on the primary system and you want to initialize RDF to a inittime , you should wait
before issuing the command until you can specify an inittime that includes the three minutes
added by RDFCOM so that the starting position in the MAT is after the Stop-RDF-Updater record.
As a precaution, if RDFCOM encounters a Stop-RDF-Updater record during its backward search
of the MAT, it issues a warning message asking if you want to proceed with initialization. If you
continue the operation, the updaters will shut down when they encounter the Stop-RDF-Updater
record, at which time you should try to perform the NonStop SQL/MP DDL operation manually
again on the backup system.
TMF Shutdown Records
TMF shutdown records in the MAT do not cause a problem, except that if RDF is initialized to a
point in the MAT prior to a TMF shutdown record, then once you have started RDF it will shutdown
as soon as it reaches that TMF Shutdown record. All you need to do then is restart RDF.
Online Installation and Initialization Without Stopping RDF
For the procedure described in “Initializing RDF Without Stopping TMF (Using INITTIME Option)”
(page 73), you are required to stop RDF, delete the control subvolumes, reinitialize RDF, and then
restart RDF. Although unlikely, stopping RDF does leave you briefly vulnerable to inconsistent data
on the backup system if your primary system should fail after you stop RDF and delete the previous
RDF control files, but before you restart RDF.
By using the procedure that follows, you can install and initialize the RDF product without stopping
RDF, TMF, or your applications.
The procedure is best described by example. Assume that you are running RDF from \RDF04 to
\RDF06, and that your control subvolume is RDF04.
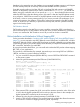
1. For your current RDF subsystem (RDF04->RDF06), issue an RDFCOM STATUS RDF command
on the primary system.
2. Notice the general timestamp and the RTD times (11AUG2008 05:26).
RDFCOM - T0346H09 – 11AUG08
C)2008 Hewlett-Packard Development Company, L.P.
Status of \RDF04 -> \RDF06 RDF 2008/08/11 05:26:49.082
Control Subvol: $SYSTEM.RDF04
Current State : Normal
RDF Process Name RTD Time Pri Volume Seqnce Rel Byte Addr Cpus Err
------------------ ------ --------- --- -------- ------ ------------- ----- ----
Monitor $RMON 185 $AUDMAT 56 1: 2
Extractor (0) $REXT0 0:00 185 $AUDMAT 56 928000 1: 2
Receiver (0) $RRCV0 0:00 185 $MIT 12 1: 2
Imagetrail (0) $IMAGE0 3822
Imagetrail (0) $IMAGE1 793
Imagetrail (0) $IMAGE2 1790
Imagetrail (0) $IMAGE3 998
Purger $RPRG 185 1: 2
$DATA10 -> $DATA10 $RUPD1 1:26 185 $IMAGE0 3821 1926445 1: 2
$DATA11 -> $DATA11 $RUPD2 0:02 185 $IMAGE1 793 811008 2: 3
$DATA12 -> $DATA13 $RUPD3 0:05 185 $IMAGE2 1790 1568 3: 0
$DATA13 -> $DATA14 $RUPD3 0:10 185 $IMAGE3 998 3 3587 3: 0
]
3. If the extractor RTD is greater than 0:00, wait until the extractor reports this value. If the value
is 0:00, take the highest updater RTD and round up to the next minute. In this example, the
highest updater RTD rounded up to the next minute is 2:00.
4. Subtract this value from the general timestamp (11AUG2008 05:24).
5. Issue the STOP UPDATE command. This command stops the updaters but allows the extractor
and receiver to continue to shipping and storing audit, respectively.
Initializing and Configuring RDF 75