
SQL/MX Remote Conversational Interface (RMXCI) Guide for SQL/MX Release 3.2 (H06.25+, J06.14+)

Verifying the installer file version
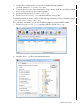
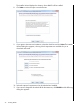
To display the version of the installer file, complete the following steps:
1. Change to the directory, which contains the RMXCI installer file:
cd installer-directory
where,
installer-directory is the directory where you downloaded the installer.
2. Enter the following command to get the version information:
java -jar rmxciInstaller.jar v
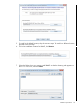
For example,
C:\>cd RMXCI
C:\RMXCI>java -jar rmxciInstaller.jar v
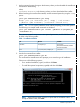
The following is a sample output:
T0774_V32_30AUG12_HP_NONSTOP(TM)_RMXCI_2011_12_12
C:\RMXCI>
Installing RMXCI
Before following the installation procedures, you must install the NonStop SQLMX JDBC Type 4
Driver on the client workstation. For more information, see “Pre-installation procedures” (page 16).
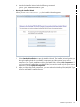
You can run the installer from the Installer Wizard Graphical User Interface (GUI) or from the
command line.
• Launching the Installer Wizard:
NOTE: To run the Installer Wizard on Linux, the X Window system must be installed on the
client workstation. If the client workstation does not have the X Window system, you can install
from the command line.
1. Locate the rmxciInstaller.jar file in the folder where you downloaded the installer.
2. Verify that the rmxciInstaller.jar file appears as an Executable JAR file. If not,
skip the next two steps.
3. Double-click the rmxciInstaller.jar file icon to launch the Installer Wizard.
4. Proceed to the steps listed in the procedure Running the Installer Wizard.
5. At the command prompt, change to the directory where you downloaded the installer:
cd installer-directory
where,
installer-directory is the directory where you downloaded the installer.
22 Installing RMXCI