
H06.12 Software Installation and Upgrade Guide


$SYSTEM.CSSnn.C7953P00
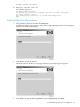
Step 3: Initiate the Firmware Update
1. From the Action list, select Firmware Update.
2. Click Add or Add all.
3. Click Perform Action.
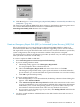
The SWAN Firmware Update dialog box appears.
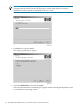
4. Leave blank the $SYSTEM.CSSnn subvolume and filename (CP7953P00) created during
the most recent DSM/SCM Build/Apply, and click OK.
If you have just loaded the new RVU, the SWAN firmware location should point to the
correct subvolume and file version. However, if you have performed a Build/Apply for a
new SWAN firmware SPR, specify that location and click OK.
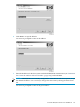
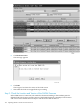
5. The Progress bar shows the number of CLIPs running and the number of CLIPs that have
been updated (passed). Any CLIPs that fail are also noted. Select Help for more information.
Under Resource Name, a green checkmark appears besides all of those CLIPS that have
been successfully updated. At this point, the CLIP Firmware Version might display Not
Available and the Compare State might display Unknown.
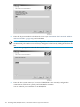
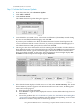
6. If the Failed column displays a failed action on a CLIP, select Action Summary. The Action
Status Summary window appears with information about recent actions, including their
status and overall progress:
a. Select the CLIP action that failed.
b. Select Details or right-click the displayed resource. See the OSM online help for more
information.
c. Correct the problem. See “If a CLIP Fails to Update, Use the OSM Actions Dialog Box
” (page 150). If you still have problems with the SWAN CLIP updating, see the SWAN
Concentrator and WAN Subsystem Troubleshooting Manual.
Using the OSM Multi-Resource Actions Dialog to Update SWAN and SWAN 2 Firmware 149