
H06.13 Software Installation and Upgrade Guide

11213110Mirror
11212110Mirror Backup
• A SCSI-Load attempts to load the system from a disk in group, module, slot 11.1.11 of a
NonStop S-series I/O enclosure. See Table 15 (page 91).
• You can configure additional alternate system disks. To create an alternate system disk, see
the NonStop NSxxxx–Series Hardware Installation Manual. Then use OSM to make the disk
available in the Configuration drop-down menu in the System Load dialog box. The alternative
system disks are displayed in the Attributes tab under the System object in the OSM Service
Connection and are also displayed in the OSM Low-Level Link System Load dialog box in the
Configuration shortcut menu.
Alerts
Before performing a system load:
• Before halting the processors, stop applications that are still running, including TMF.
NOTE: To stop TMF, at a TACL prompt, enter: 5> TMFCOM STOP TMF
The NonStop NS-Series Operations Guide contains detailed information on the best methods
for stopping applications, devices, and processes.
• Do not close the System Load Startup dialog box while startup is in progress. If you attempt
to close the dialog box, a message dialog box appears notifying you that the system startup
process will be stopped if you continue.
• If you stop a system startup before it has finished, the state of your system will be unpredictable.
You might need to perform another system startup to enable the system to resume normal
operation.
• If you must stop the system startup process, click Abort. (The abort process should take effect
within 30 seconds.)
• If you do not select a $SYSTEM volume, you must revive the mirrored disk.
• In the System Load dialog box, either select all four disk paths, or check that the selected disk
path is correct. If you do not select all four or select the incorrect disk path, the system does
not load properly.
• If you have problems performing a system load, see the NonStop NS-Series Operations Guide,
Chapter 15.
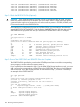
Halt the Processors
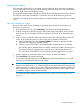
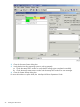
1. Log on to the OSM Low-Level Link.
2. On the toolbar, click Processor Status to display the Processor Status dialog box.
3. Under Processor Status, select all processors.
4. From the Processor Actions list, select Halt.
5. Click Perform action.
6. Click OK when asked “Are you sure you want to do Halts?”
7. When the Action Status box confirms that all processors have halted, close the Processor Status
dialog box.
92 Loading the H06.13 RVU