
H06.25 Software Installation and Upgrade Guide
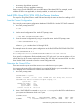
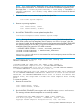

$SYSTEM.SYS01
CODE EOF LAST MODIFIED OWNER RWEP PExt SExt
OSIMAGE 0 57393152 05APR2000 8:56 255,255 NUNU 200 200
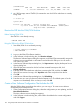
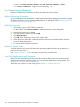
3. At a TACL prompt, enter a STATUS 0,0 command to see which SYSnn subvolume is currently
being used:
3> status 0,0
System \ELI
Process Pri PFR %WT Userid Program file Hometerm
0,0 201 P R 000 255,255 $SYSTEM.SYS01.NMONTOR $YMIOP.#CLCI
Swap File Name: $SYSTEM.#0
Receive the SPR Into the DSM/SCM Archive
Before Starting DSM/SCM
Start TMF if it is not already running:
> TMFCOM START TMF
Bring the SPR Into the DSM/SCM Archive
1. Start DSM/SCM if it is not already running:
> volume $dsmscm_vol.ZDSMSCM
> RUN STARTSCM
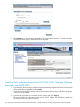
2. Log on to the DSM/SCM Planner Interface.
3. In the Software in Archive dialog box, click Receive software.
The Receive Software Request dialog box appears, and DSM/SCM automatically assigns the
software input a name based on information received from the SPR input. You can enter a
new name if you want.
4. In the Receive Software Request dialog box, click Input source to display the Request Source
Options dialog box.
5. If the SPR has been received on disk or has been restored from tape to disk, click
Volume.subvolume.
6. Enter the name of the distribution subvolume containing the SPR, and then click Add.
7. If the SPR was received on tape, click Tape drive and select a tape drive from the list.
8. Click OK.
9. In the Receive Software Request dialog box, click Scheduling.
10. Enter the time you want your Receive Software Request to run. The default option is for the
request to run immediately. If this is what you want, click OK.
Create a New Software Configuration That Includes the SPR
After the SPR has been received into the Archive, you can copy it. To create a new software
configuration that includes the SPR:
1. In the Configuration Revisions dialog box, select the configuration you are updating, and click
New Software Revision.
The New software revision dialog box appears.
2. In the Software in Archive dialog box, select SPRs to be added to the current configuration
and click Copy to.
162 Using DSM/SCM With the Planner Interface to Install SPRs