
H06.27 Software Installation and Upgrade Guide


1. Log on to the OSM Low-Level Link.
2. On the toolbar, click Processor Status to display the Processor Status dialog box.
3. Under Processor Status, select all processors.
4. From the Processor Actions list, select Hard Reset.
5. Click Perform action.
6. Click OK when asked “Do you really want to perform a Hard Reset on the selected
processor(s)?”
7. When the Action Status box confirms that all processors have been reset, close the Processor
Status dialog box.
5. (Optional) Upgrade the CLIM Software
If you have not upgraded the CLIMs online before performing this RVU upgrade, upgrade the CLIM
software on each CLIM now. See the instructions for upgrading CLIM software in the Cluster I/O
Protocols (CIP) Configuration and Management Manual.
6. Loading the System
If the automatic system load is not successful using one load path, the system load task attempts
to use another path and keeps trying until all possible paths have been used or the system load is
successful. Eight paths are available for loading.
The command interpreter input (CIIN) file is automatically invoked after the first processor is loaded.
The CIIN file contains the TACL RELOAD * command, which loads the remaining processors.
For details on load paths, see the hardware installation manual for your NonStop system.
Steps for Loading the System
A normal system load consists of loading the operating system from disk into the memory of
processor 0 or processor 1 (this assumes the default location is the $SYSTEM volume):
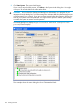
1. In the OSM Low-Level Link, select Start System. The System Load dialog box appears.
2. From the Configuration drop-down menu under System Load Configuration, select a
system load volume. You can select $SYSTEM, FCDM-Load, SCSI-Load,
CLIM-Attached-Load, or an alternate system volume.
a.
b. If you are using non-default locations for the $SYSTEM volume:
• For FCDM-Load, set the controller location and disk partition location using the Disk
Configuration dialog boxes in the OSM Low-Level Link.
• For CLIM-Attached-Load, change the CLIM name, CLIM location, and disk location
using the OSM Low-Level Link System Load dialog box and CLIM Attached Disk
Configuration dialog boxes as needed.
3. In the SYSnn box, enter nn, which is the number of the system subvolume that contains the
version of the operating system you will load, the version created by DSM/SCM.
a. Under Configuration File, select Current (CONFIG), the default configuration file that
represents the configuration currently running.
b. Under SYSnn and CIIN Option, verify that the CIIN Disabled option is not selected.
The CIIN file must be enabled because it contains commands needed to start the server.
The startup TACL process performs the commands in the CIIN file and then logs off.
For a description of the CIIN file, see the appropriate planning guide for your system.
4. Under Configuration, ensure that all the check boxes for all paths are selected.
5. (Optional) Upgrade the CLIM Software 119