
J06.04 Software Installation and Upgrade Guide


See the applicable softdocs for details.
See Section : “Managing Microcode and Firmware” for a description of the firmware installation
procedure.
Halt the Processors
1. Log on to the OSM Low-Level Link.
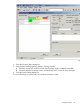
2. On the toolbar, click Processor Status to display the Processor Status dialog box.
3. Under Processor Status, select all processors.
4. From the Processor Actions list, select Halt.
5. Click Perform action.
6. Click OK when asked “Are you sure you want to do Halts?”
7. When the Action Status box confirms that all processors have halted, close the Processor Status
dialog box.
While the Processors are Halted
If necessary, while the processors are halted, update the Server Blade firmware. If HSS firmware
has changed, hard reset all processor blades as follows:
1. Log on to the OSM Low-Level Link.
2. On the toolbar, click Processor Status to display the Processor Status dialog box.
3. Under Processor Status, select all processors.
4. From the Processor Actions list, select Hard Reset.
5. Click Perform action.
6. Click OK when asked “Do you really want to perform a Hard Reset on the selected
processor(s)?”
7. When the Action Status box confirms that all processors have been reset, close the Processor
Status dialog box.
Loading the System
If the automatic system load is not successful using one load path, the system load task attempts
to use another path and keeps trying until all possible paths have been used or the system load is
successful. Eight paths are available for loading.
The command interpreter input (CIIN) file is automatically invoked after the first processor is loaded.
The CIIN file contains the TACL RELOAD * command, which loads the remaining processors.
For details on load paths, see the NonStop BladeSystem Hardware Installation Manual.
Steps for Loading the System
A normal system load consists of loading the operating system from disk into the memory of
processor 0 or processor 1 (this assumes the default location is the $SYSTEM volume):
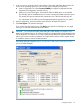
1. In the OSM Low-Level Link, select Start System. The System Load dialog box appears.
2. From the Configuration drop-down menu under System Load Configuration, select a
system load volume. You can select the $SYSTEM, FCDM-Load, CLIM Attached-Load, or
an alternate system volume.
a.
b. If you are using non-default locations for the $SYSTEM volume:
• For FCDM-Load: Set the controller location and disk partition location using the Disk
Configuration Dialog boxes in the OSM Low-Level Link.
• For a CLIM Attached-Load: Change the CLIM name, CLIM location, and disk location
using the OSM Low-Level Link System Load dialog box and CLIM Attached Disk
Configuration dialog boxes as needed.
64 Loading the J06.04 RVU