
J06.08 Software Installation and Upgrade Guide

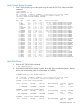

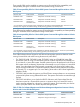
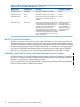
Table Of Contents
- J06.08 Software Installation and Upgrade Guide
- Contents
- About This Document
- 1 Overview of Installing This RVU
- SUT on DVD
- CLIM Software for This RVU
- Disk Space Requirements
- Operational Differences Between This RVU and H-series RVUs
- Investigating a J-Series RVU
- System Console Requirements
- Using OSM With This RVU
- Using DSM/SCM and NonStop Software Essentials With This RVU
- NonStop Software Essentials and This RVU
- DSM/SCM and This RVU
- DSM/SCM and Public DLLs
- DSM/SCM and OSS
- Upgrading the NonStop Software Essentials Client
- Upgrading the DSM/SCM Client (Planner Interface) and the T6031H02 PVU
- Summary of Software Installation Tasks
- Check or Alter the CONFTEXT File Before Installing This RVU SUT
- Installing CLIM Software
- Backing Out the DSM/SCM Revision
- Managing Microcode and Firmware
- Installation, Migration, and Fallback
- 2 Managing Microcode and Firmware
- Managing ME Firmware and ME FPGA Firmware
- Managing OA Firmware for the c7000 Enclosure
- Managing Server Blade Firmware
- Managing ServerNet Adapter Firmware
- Managing SWAN and SWAN 2 Concentrator Firmware
- Managing NonStop Cluster Switch Firmware
- Managing CLIM Firmware
- Managing S-Series Interoperability Firmware
- 3 Installation, Migration, and Fallback Considerations for This RVU
- 4 Upgrade Checklist
- 5 Preparing to Upgrade the Server Software (Preinstallation Tasks)
- Back Up Important Files
- Record the Current SYSnn
- Save the Current Configuration File (CONFxxyy)
- Verify System Processes
- Check Processor Status
- Check System Components
- Verify the State of the Internal ServerNet Fabric
- Verify Firmware
- Verify Critical System Processes
- Verify Disk Drives
- Verify Tape Drives (If Necessary)
- Verify That the CLIMs Are in the Started State
- Verify That the CIP Providers Are in the Started State
- Check the Status of the Spooler Collector
- Check for Sufficient Swap File Space
- Install Node Interoperability SPRs
- Back Up System Information
- Manually Install the NonStop Software Essentials Server Product
- 6 Installing a SUT for This RVU Using NonStop Software Essentials
- 7 Installing a SUT for This RVU Using the Planner Interface
- 8 Running ZPHIRNM
- 9 Loading This RVU
- 10 Resuming Normal Operations
- Revive the Down Half of the Mirrored Disk
- Validate Your Core License
- Start System Applications
- Run merge_whatis
- Configure Specific Products (Post-System Load)
- 11 Backing Out the DSM/SCM Revision
- 12 Running ZPHIRNM to Reactivate the Previous Software Revision
- 13 Falling Back on the CLIMs, Loading the Previous RVU, and Resuming Normal Operations
- Fallback Considerations for the Power Regulator
- Alerts
- Task Overview
- Before Halting the Processors
- Halt the Processors
- While the Processors are Halted
- Prepare the CLIMs
- Load the System
- Complete CLIM Setup
- Revert Firmware (If Necessary)
- Install Specific OSS Files (If Necessary)
- Verify That the System Is Started
- A Using DSM/SCM and NonStop Software Essentials to Install SPRs
- B Using DSM/SCM and Planner Interface to Install SPRs
- C Installing SWID and DSM/SCM PVU Using NonStop Software Essentials Client Software
- Alerts
- Copy (RESTORE) the H02 DSM/SCM Product Version to Disk (If Necessary)
- Receive the H02 SWID and DSM/SCM SPRs
- Create a New Software Revision for H02 DSM/SCM and SWID SPRs
- Build and Apply the DSM/SCM H02 Software Product Revision
- Run the INSTALL^TEMPLATES Macro
- Restart Applications
- Recovery for Problems While Installing the H02 Version of DSM/SCM
- Install the NonStop Software Essentials Client
- Install the NonStop Essentials Client From the HP Insight Control for NonStop DVD
- D Installing SWID, DSM/SCM PVU, and Planner Interface (PI) Client Software
- Alerts
- Copy (RESTORE) the H02 DSM/SCM Product Version to Disk (If Necessary)
- Receive the H02 SWID and DSM/SCM SPRs
- Create a New Software Revision for H02 DSM/SCM and SWID SPRs
- Build and Apply the DSM/SCM H02 Software Product Revision
- Rename the Applied DSM/SCM H02 Files By Running ZPHIRNM
- Run the INSTALL^TEMPLATES Macro
- Restart Applications
- Recovery for Problems While Installing the H02 Version of DSM/SCM
- Install the DSM/SCM Client From ZDSMSCM
- E Updating SWAN Concentrator CLIP Firmware
- Acronyms
- Index
Verify Critical System Processes
1. From a TACL prompt, log on to the system using the super ID (255,255). Enter the LISTDEV
command:
> SCF LISTDEV
$ADBIT RESULTS 18> scf
SCF - T9082H01 - (01MAY08) (15MAR08) - 05/09/2008 16:13:56 System \ATLAS
(C) 1986 Tandem (C) 2003 Hewlett Packard Development Company, L.P.
(Invoking \ATLAS.$SYSTEM.STARTUP.SCFCSTM)
1-> listdev
LDev Name PPID BPID Type RSize Pri Program
0 $0 0,3 1,3 ( 1,0 ) 102 201 \ATLAS.$SYSTEM.SYS15.OPCOLL
1 $NCP 0,14 1,14 (62,6 ) 3 199 \ATLAS.$SYSTEM.SYS15.NCPOBJ
3 $YMIOP 0,5 1,5 ( 6,4 ) 80 205 \ATLAS.$SYSTEM.SYS15.TMIOP
5 $Z0 0,7 1,7 ( 1,2 ) 102 200 \ATLAS.$SYSTEM.SYS15.OCDIST
6 $SYSTEM 0,257 1,257 ( 3,53) 4096 220 \ATLAS.$SYSTEM.SYS15.TSYSDP2
7 $ZOPR 0,8 1,8 ( 1,0 ) 102 201 \ATLAS.$SYSTEM.SYS15.OAUX
63 $ZZKRN 0,295 1,363 (66,0 ) 4096 180 \ATLAS.$SYSTEM.SYS15.OZKRN
64 $ZZWAN 0,292 1,342 (50,3 ) 132 180 \ATLAS.$SYSTEM.SYS15.WANMGR
65 $ZZW03 3,284 0,0 (50,0 ) 0 199 \ATLAS.$SYSTEM.SYS15.CONMGR
66 $ZZW02 2,284 0,0 (50,0 ) 0 199 \ATLAS.$SYSTEM.SYS15.CONMGR
67 $ZZW01 1,285 0,0 (50,0 ) 0 199 \ATLAS.$SYSTEM.SYS15.CONMGR
68 $ZZW00 0,324 0,0 (50,0 ) 0 199 \ATLAS.$SYSTEM.SYS15.CONMGR
69 $ZZTCP 0,337 1,323 (72,0 ) 132 200 \ATLAS.$SYSTEM.SYS15.TCP6MAN
70 $ZZSTO 0,293 1,364 (65,0 ) 4096 180 \ATLAS.$SYSTEM.SYS15.TZSTO
71 $ZZSMN 0,338 1,339 (64,1 ) 132 180 \ATLAS.$SYSTEM.SYS15.SANMAN
72 $ZZSCL 0,336 1,335 (64,0 ) 132 199 \ATLAS.$SYSTEM.SYS15.SNETMON
73 $ZZLAN 0,294 1,341 (43,0 ) 132 199 \ATLAS.$SYSTEM.SYS15.LANMAN
74 $ZWBAB 0,323 1,343 (50,4 ) 132 179 \ATLAS.$SYSTEM.SYS15.WANBOOT
75 $ZWBAA 0,322 1,344 (50,4 ) 132 179 \ATLAS.$SYSTEM.SYS15.WANBOOT
85 $ZSNET 0,295 1,363 (66,0 ) 4096 180 \ATLAS.$SYSTEM.SYS15.OZKRN
86 $ZSLM2 0,290 1,321 (67,0 ) 1024 221 \ATLAS.$SYSTEM.SYS15.TZSLM2
89 $ZNET 0,155 1,176 (50,63) 3900 175 \ATLAS.$SYSTEM.SYS15.SCP
90 $ZM03 3,281 0,0 (45,0 ) 132 201 \ATLAS.$SYSTEM.SYS15.QIOMON
91 $ZM02 2,281 0,0 (45,0 ) 132 201 \ATLAS.$SYSTEM.SYS15.QIOMON
92 $ZM01 1,282 0,0 (45,0 ) 132 201 \ATLAS.$SYSTEM.SYS15.QIOMON
93 $ZM00 0,296 0,0 (45,0 ) 132 201 \ATLAS.$SYSTEM.SYS15.QIOMON
94 $ZLOG 0,339 1,375 ( 1,0 ) 4024 150 \ATLAS.$SYSTEM.SYS15.EMSACOLL
Verify Disk Drives
1. Enter the SCF STATUS DISK command:
> SCF STATUS DISK $*
2. Verify that the STATUS DISK display includes all the disk drives and that the primary, backup,
mirror, and mirror-backup paths are all described as STARTED:
$SYSTEM TOOLS 48> SCF STATUS DISK $*
SCF - T9082H01 - (01MAY08) (15MAR08) - 07/06/2008 10:55:16 System \ATLAS
(C) 1986 Tandem (C) 2003 Hewlett Packard Development Company, L.P.
STORAGE - Status DISK \ATLAS.$SYSTEM
LDev Primary Backup Mirror MirrorBackup Primary Backup
PID PID
6 *STARTED STARTED STOPPED STOPPED 0,257 1,257
STORAGE - Status DISK \ATLAS.$AD01
LDev Primary Backup Mirror MirrorBackup Primary Backup
PID PID
152 *STARTED STARTED STOPPED STOPPED 0,333 1,288
STORAGE - Status DISK \ATLAS.$ADAUD
LDev Primary Backup Mirror MirrorBackup Primary Backup
PID PID
Verify System Processes 45