
J06.08 Software Installation and Upgrade Guide

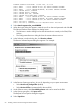
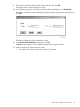

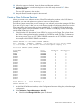
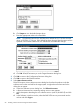
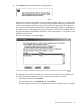
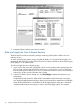
Table Of Contents
- J06.08 Software Installation and Upgrade Guide
- Contents
- About This Document
- 1 Overview of Installing This RVU
- SUT on DVD
- CLIM Software for This RVU
- Disk Space Requirements
- Operational Differences Between This RVU and H-series RVUs
- Investigating a J-Series RVU
- System Console Requirements
- Using OSM With This RVU
- Using DSM/SCM and NonStop Software Essentials With This RVU
- NonStop Software Essentials and This RVU
- DSM/SCM and This RVU
- DSM/SCM and Public DLLs
- DSM/SCM and OSS
- Upgrading the NonStop Software Essentials Client
- Upgrading the DSM/SCM Client (Planner Interface) and the T6031H02 PVU
- Summary of Software Installation Tasks
- Check or Alter the CONFTEXT File Before Installing This RVU SUT
- Installing CLIM Software
- Backing Out the DSM/SCM Revision
- Managing Microcode and Firmware
- Installation, Migration, and Fallback
- 2 Managing Microcode and Firmware
- Managing ME Firmware and ME FPGA Firmware
- Managing OA Firmware for the c7000 Enclosure
- Managing Server Blade Firmware
- Managing ServerNet Adapter Firmware
- Managing SWAN and SWAN 2 Concentrator Firmware
- Managing NonStop Cluster Switch Firmware
- Managing CLIM Firmware
- Managing S-Series Interoperability Firmware
- 3 Installation, Migration, and Fallback Considerations for This RVU
- 4 Upgrade Checklist
- 5 Preparing to Upgrade the Server Software (Preinstallation Tasks)
- Back Up Important Files
- Record the Current SYSnn
- Save the Current Configuration File (CONFxxyy)
- Verify System Processes
- Check Processor Status
- Check System Components
- Verify the State of the Internal ServerNet Fabric
- Verify Firmware
- Verify Critical System Processes
- Verify Disk Drives
- Verify Tape Drives (If Necessary)
- Verify That the CLIMs Are in the Started State
- Verify That the CIP Providers Are in the Started State
- Check the Status of the Spooler Collector
- Check for Sufficient Swap File Space
- Install Node Interoperability SPRs
- Back Up System Information
- Manually Install the NonStop Software Essentials Server Product
- 6 Installing a SUT for This RVU Using NonStop Software Essentials
- 7 Installing a SUT for This RVU Using the Planner Interface
- 8 Running ZPHIRNM
- 9 Loading This RVU
- 10 Resuming Normal Operations
- Revive the Down Half of the Mirrored Disk
- Validate Your Core License
- Start System Applications
- Run merge_whatis
- Configure Specific Products (Post-System Load)
- 11 Backing Out the DSM/SCM Revision
- 12 Running ZPHIRNM to Reactivate the Previous Software Revision
- 13 Falling Back on the CLIMs, Loading the Previous RVU, and Resuming Normal Operations
- Fallback Considerations for the Power Regulator
- Alerts
- Task Overview
- Before Halting the Processors
- Halt the Processors
- While the Processors are Halted
- Prepare the CLIMs
- Load the System
- Complete CLIM Setup
- Revert Firmware (If Necessary)
- Install Specific OSS Files (If Necessary)
- Verify That the System Is Started
- A Using DSM/SCM and NonStop Software Essentials to Install SPRs
- B Using DSM/SCM and Planner Interface to Install SPRs
- C Installing SWID and DSM/SCM PVU Using NonStop Software Essentials Client Software
- Alerts
- Copy (RESTORE) the H02 DSM/SCM Product Version to Disk (If Necessary)
- Receive the H02 SWID and DSM/SCM SPRs
- Create a New Software Revision for H02 DSM/SCM and SWID SPRs
- Build and Apply the DSM/SCM H02 Software Product Revision
- Run the INSTALL^TEMPLATES Macro
- Restart Applications
- Recovery for Problems While Installing the H02 Version of DSM/SCM
- Install the NonStop Software Essentials Client
- Install the NonStop Essentials Client From the HP Insight Control for NonStop DVD
- D Installing SWID, DSM/SCM PVU, and Planner Interface (PI) Client Software
- Alerts
- Copy (RESTORE) the H02 DSM/SCM Product Version to Disk (If Necessary)
- Receive the H02 SWID and DSM/SCM SPRs
- Create a New Software Revision for H02 DSM/SCM and SWID SPRs
- Build and Apply the DSM/SCM H02 Software Product Revision
- Rename the Applied DSM/SCM H02 Files By Running ZPHIRNM
- Run the INSTALL^TEMPLATES Macro
- Restart Applications
- Recovery for Problems While Installing the H02 Version of DSM/SCM
- Install the DSM/SCM Client From ZDSMSCM
- E Updating SWAN Concentrator CLIP Firmware
- Acronyms
- Index
PATHWAY CONTROL FILE DATED: 18 APR 2005, 09:56:08
$Z038: WARN - *1079* SERVER CB-001, NO STATIC SERVERS DEFINED
$Z038: WARN - *1079* SERVER IS-001, NO STATIC SERVERS DEFINED
$Z038: WARN - *1079* SERVER MISERVER, NO STATIC SERVERS DEFINED
$Z038: SERVER OM-001, STARTED
$Z038: SERVER SM-001, STARTED
$Z038: SERVER SM-T-001, STARTED
$Z038: SERVER T9154-HELP-SERV, STARTED
$Z038: WARN - *1079* SERVER TA-001, NO STATIC SERVERS DEFINED
$Z038: WARN - *1079* SERVER TISERVER, NO STATIC SERVERS DEFINED
$Z038: WARN - *1079* SERVER US-001, NO STATIC SERVERS DEFINED
$Z038: TCP TCP-H, STARTED
$Z038: TCP TCP-T, STARTEDStart the DSM/SCM Planner Interface
2. Select Start>Programs>dsm_scm>DSMSCM.
3. When the Logon dialog box appears, enter the user ID or alias and password and click OK.
The Planner Interface screen displays two dialog boxes:
• The Software in Archive dialog box lists the software that is currently in the DSM/SCM
Archive.
• The Configuration Revisions dialog box lists the current software revisions.
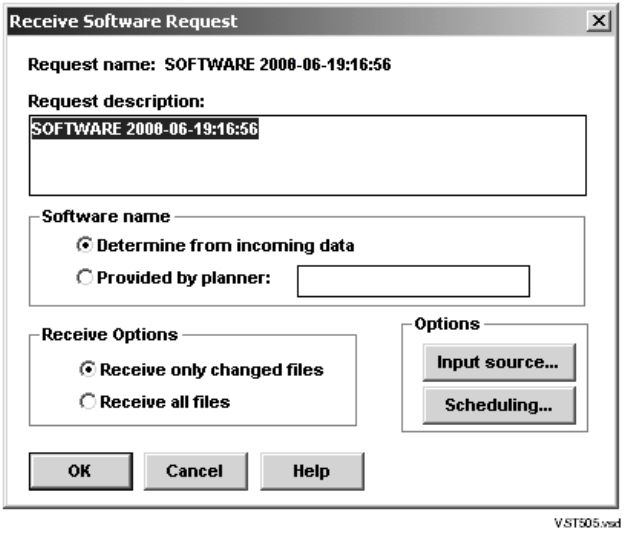
4. In the Software in Archive dialog box, click Receive software.
The Receive Software Request dialog box appears. For example:
5. In the Receive Options group box, do one of, depending on your system environment:
• Select Receive only changed files (default)
• Select Receive all files (recommended for the new RVU)
6. Under Software name, select Provided by planner and enter a name for the RVU.
7. In the Options group box, click Input source.
The Request Source Options dialog box appears.
8. Select Tape drive.
64 Installing a SUT for This RVU Using the Planner Interface