
J06.08 Software Installation and Upgrade Guide

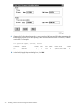
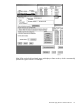

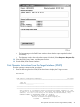


Table Of Contents
- J06.08 Software Installation and Upgrade Guide
- Contents
- About This Document
- 1 Overview of Installing This RVU
- SUT on DVD
- CLIM Software for This RVU
- Disk Space Requirements
- Operational Differences Between This RVU and H-series RVUs
- Investigating a J-Series RVU
- System Console Requirements
- Using OSM With This RVU
- Using DSM/SCM and NonStop Software Essentials With This RVU
- NonStop Software Essentials and This RVU
- DSM/SCM and This RVU
- DSM/SCM and Public DLLs
- DSM/SCM and OSS
- Upgrading the NonStop Software Essentials Client
- Upgrading the DSM/SCM Client (Planner Interface) and the T6031H02 PVU
- Summary of Software Installation Tasks
- Check or Alter the CONFTEXT File Before Installing This RVU SUT
- Installing CLIM Software
- Backing Out the DSM/SCM Revision
- Managing Microcode and Firmware
- Installation, Migration, and Fallback
- 2 Managing Microcode and Firmware
- Managing ME Firmware and ME FPGA Firmware
- Managing OA Firmware for the c7000 Enclosure
- Managing Server Blade Firmware
- Managing ServerNet Adapter Firmware
- Managing SWAN and SWAN 2 Concentrator Firmware
- Managing NonStop Cluster Switch Firmware
- Managing CLIM Firmware
- Managing S-Series Interoperability Firmware
- 3 Installation, Migration, and Fallback Considerations for This RVU
- 4 Upgrade Checklist
- 5 Preparing to Upgrade the Server Software (Preinstallation Tasks)
- Back Up Important Files
- Record the Current SYSnn
- Save the Current Configuration File (CONFxxyy)
- Verify System Processes
- Check Processor Status
- Check System Components
- Verify the State of the Internal ServerNet Fabric
- Verify Firmware
- Verify Critical System Processes
- Verify Disk Drives
- Verify Tape Drives (If Necessary)
- Verify That the CLIMs Are in the Started State
- Verify That the CIP Providers Are in the Started State
- Check the Status of the Spooler Collector
- Check for Sufficient Swap File Space
- Install Node Interoperability SPRs
- Back Up System Information
- Manually Install the NonStop Software Essentials Server Product
- 6 Installing a SUT for This RVU Using NonStop Software Essentials
- 7 Installing a SUT for This RVU Using the Planner Interface
- 8 Running ZPHIRNM
- 9 Loading This RVU
- 10 Resuming Normal Operations
- Revive the Down Half of the Mirrored Disk
- Validate Your Core License
- Start System Applications
- Run merge_whatis
- Configure Specific Products (Post-System Load)
- 11 Backing Out the DSM/SCM Revision
- 12 Running ZPHIRNM to Reactivate the Previous Software Revision
- 13 Falling Back on the CLIMs, Loading the Previous RVU, and Resuming Normal Operations
- Fallback Considerations for the Power Regulator
- Alerts
- Task Overview
- Before Halting the Processors
- Halt the Processors
- While the Processors are Halted
- Prepare the CLIMs
- Load the System
- Complete CLIM Setup
- Revert Firmware (If Necessary)
- Install Specific OSS Files (If Necessary)
- Verify That the System Is Started
- A Using DSM/SCM and NonStop Software Essentials to Install SPRs
- B Using DSM/SCM and Planner Interface to Install SPRs
- C Installing SWID and DSM/SCM PVU Using NonStop Software Essentials Client Software
- Alerts
- Copy (RESTORE) the H02 DSM/SCM Product Version to Disk (If Necessary)
- Receive the H02 SWID and DSM/SCM SPRs
- Create a New Software Revision for H02 DSM/SCM and SWID SPRs
- Build and Apply the DSM/SCM H02 Software Product Revision
- Run the INSTALL^TEMPLATES Macro
- Restart Applications
- Recovery for Problems While Installing the H02 Version of DSM/SCM
- Install the NonStop Software Essentials Client
- Install the NonStop Essentials Client From the HP Insight Control for NonStop DVD
- D Installing SWID, DSM/SCM PVU, and Planner Interface (PI) Client Software
- Alerts
- Copy (RESTORE) the H02 DSM/SCM Product Version to Disk (If Necessary)
- Receive the H02 SWID and DSM/SCM SPRs
- Create a New Software Revision for H02 DSM/SCM and SWID SPRs
- Build and Apply the DSM/SCM H02 Software Product Revision
- Rename the Applied DSM/SCM H02 Files By Running ZPHIRNM
- Run the INSTALL^TEMPLATES Macro
- Restart Applications
- Recovery for Problems While Installing the H02 Version of DSM/SCM
- Install the DSM/SCM Client From ZDSMSCM
- E Updating SWAN Concentrator CLIP Firmware
- Acronyms
- Index
(c) Hewlett Packard Development Company L.P., 1994-2004
All Rights Reserved
==============================================================================
F1-Logon F8-Clear entry
F15-Help SF16-Exit
Ready
2. Enter your user ID or alias (if necessary) and password and press F1 to log on to the Target
Interface.
The Main Menu appears:
DSM Software Configuration Manager Main Menu
==============================================================================
\WARRIOR Prior snapshot 2007-11-09:12:18:44
Selection number: 0
==============================================================================
Choose an action by entering the selection number of an item from the list
below.
==============================================================================
1 Create system report
2 Create system snapshot
3 Perform target activities
4 Perform audit
5 Perform database verify
9 Enable trace (for support use only)
==============================================================================
F1-Select F4-Show Messages
F15-Help F16-Return SF16-Exit
Ready
3. From the ZPHITI Main Menu, enter 3 (Perform target activities) in the Selection number field,
and press F1 to display the Target Menu - Select Target screen.
DSM Software Configuration Manager Target Menu - Select Target
==============================================================================
\WARRIOR Prior snapshot 2007-09-20:12:18:44
Selection number:
==============================================================================
Choose a target selection number from the list below. Status information is
shown for requests still in progress.
==============================================================================
1 NEW CONFIG
2 DEFAULT
3
4
5
6
7
8
9
===========================More Targets PgDn/PgUp=============================
F1-Select
F15-Help F16-Return SF16-Exit
Ready
4. In the Selection number field, enter the number corresponding to the logical target to which
you applied the software (selection 2 in this example), and press F1 to display the Target
Menu - Select Action screen.
76 Installing a SUT for This RVU Using the Planner Interface