
J06.11 Software Installation and Upgrade Guide


6. For the two IP CLIMs configured with a Maintenance Provider (usually the first two IP CLIMs,
for example, N1002581/N1002582 for NonStop BladeSystems), configure the eth0:0
interface. Using the IP address and netmask of ZTCP0 and ZTCP1 you collected by using the
SCF INFO CLIM DETAIL and CLIMCMD interface -info commands prior to starting the
downgrade, and using the iLO serial console, enter these commands at the Linux prompt:
climconfig interface -add eth0:0
climconfig ip -add eth0:0 -ipaddress 192.168.36.10 -netmask 255.255.0.0
7. If you reimaged both CLIMs and they were being used to host DHCP, DNS, and BOOTP
services on your dedicated service LAN, as determined in “Prepare to Fall Back to Previous
CLIM Software” (page 116), and this is a J-series system that relies on these CLIMs to provide
BOOTP servers (i.e., all NonStop systems running J-series software except for NS2000), you
must log on to the OSM Low-Level Link and copy the system-specific HSS file to the CLIMs
now—before loading the system—as described in “Complete CLIM Setup” (page 124). If this
system does not need CLIM-based BOOTP services but other systems on your LAN do, you
can perform this OSM Low-Level Link logon and copy HSS file procedure later.
Load the System
A normal system load consists of loading the operating system from disk into the memory of
processor 0 or processor 1:
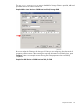
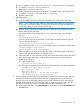
1. In the OSM Low-Level Link, select Start System. The System Load dialog box appears.
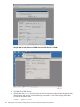
2. In the System Load dialog box, select $SYSTEM or a saved configuration.
a. In the SYSnn field, enter nn, which is the number of the system subvolume that contains
the version of the operating system you will load.
b. Under SYSnn and CIIN Option, verify that the CIIN Disabled check box is unchecked.
The CIIN file must be enabled because it contains commands needed to start the server.
The startup TACL process performs the commands in the CIIN file and then logs off. For
a description of the CIIN file, see the appropriate planning guide for your system.
3. Under Configuration File, select Saved Version (CONFigxx.yy:).
Refer to the list of configuration files generated before beginning this procedure.
4. Under Configuration, ensure that the correct paths are checked.
5. In the System Load dialog box, click Start System. The system load begins.
If you want to stop the load process, click Abort in the System Load dialog box. You might
wait up to 30 seconds before the abort takes effect.
CAUTION: Do not close the System Load dialog box while startup is in progress. If you
attempt to close the dialog box, an OSM message box indicates that the system startup process
will be stopped if you continue. If you stop a system startup before the operation finishes, the
state of your system cannot be predicted. You might need to perform another system startup
to enable the system to resume normal operation.
If one or more of the startup event stream windows or startup TACL windows does not launch
on the system console after a few minutes (5 to 8 minutes), abort system startup, close the
OSM Low-Level Link, reboot the system console, and restart the system load using the OSM
Low-Level Link again.
6. Monitor the system startup process. Messages indicating the progress and completion of the
system load, and the reload of processors indicated in the CIIN file, appear in these display
locations on the system console.
When the system load is complete (the operating system is loaded successfully into the memory
of processor 0 or processor 1), the Detailed box on the System Load dialog box displays:
Load the System 123