
J06.11 Software Installation and Upgrade Guide


1. Make sure the HSS firmware on the blade element needs to be updated as described in
“Determine If the HSS Firmware Version Will Need to Be Upgraded” (page 92). If it does,
obtain the latest HSS BOOT CD.
2. Make sure the blade element is powered on.
3. Wait until the DVD LED on the front panel of the blade element turns green, then push the
DVD eject button on the DVD drive.
4. Verify that the latest HSS BOOT CD is installed in the DVD drive tray. Insert the CD if it is not
in the tray and gently push the tray to close it.
NOTE: Close the DVD tray immediately after verifying or inserting the correct HSS Boot CD.
If the tray is left open for more than one or two minutes, the CD is not detected and the
processors are not loaded when the server is started. If this situation occurs, contact your HP
authorized service provider for assistance.
5. Perform a power cycle on each of the affected blade elements to load the new HSS firmware
from the CD.
NOTE: Keep the HSS BOOT CD in the DVD drive until the next HSS BOOT CD update is
required and the CD is replaced. The HSS BOOT CD cannot be powered off and then powered
back on.
5. (Required Only for Upgrade from J06.13 or Earlier to J06.14 or Later) Perform a
Hard Reset
This procedure is necessary if you are migrating from J06.13 or an earlier J-series RVU to J06.14
or a later J-series RVU, but only if you did not already perform one of these two actions:
• A power cycle after updating system firmware through HP SUM as described in “3.
(Conditional): Update the System Firmware” (page 93).
• A Hard Reset as part of the HSS firmware update action performed from the OSM Low-Level
Link in “Updating the HSS Firmware on All J-Series Systems Except NS2000 Series” (page 93).
To perform a Hard Reset:
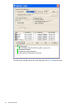
1. Logon to the OSM Low-Level Link.
2. On the toolbar, click Processor Status to display the Processor Status dialog box.
3. Under Processor Status, select all processors.
4. From the Processor Actions list, select Hard Reset.
5. Click Perform action.
6. Click OK when asked “Do you really want to perform a Hard Reset on the selected
processor(s)?”
7. When the Action Status box confirms that all processors have been reset, close the Processor
Status dialog box.
6. Upgrade the CLIM Software
If you have not upgraded the CLIMs online before performing this RVU upgrade, upgrade the CLIM
software on each CLIM now. See Upgrading CLIM Software Using OSM Low-Level Link in the
Cluster I/O Protocols (CIP) Configuration and Management Manual.
7. (Optional) Update the CLIM Firmware
If your system has CLIMs attached, it is important that your CLIM firmware be compatible with your
system. Refer to the NonStop Firmware Matrices to make sure you have compatible firmware levels
for all CLIM components.
94 Loading This RVU