
J06.15 Software Installation and Upgrade Guide


200 PORT command successful.
150 Opening data connection for zdsmexe (192.231.36.1,3212d) (2334 bytes).
226 Binary Transfer complete.
ftp: 2334123 bytes received in 0.20 seconds 11441.78Kbytes/sec.
ftp>
11. Move zdsm.exe file into the desired folder on the NonStop console, such as c:\DSMSCM or
C:\DSMJ06nn.
12. Double click on zdsm.exe to expand the files into the desired folder.
Install the DSM/SCM Client Software
1. Using Windows Explorer, double-click Setup.exe.
A DSM/SCM Setup screen appears, and an Enter Object Manager Server Class dialog box
appears with the default OM-001.
2. Click Next to accept the default.
The Enter Software Product Group Type (shared or private) dialog box appears.
3. Click Next to accept the default (private) or type in shared and click Next.
NOTE: Private software product groups can be used only by the planner who creates the
grouping. Shared software product groups can be used by other planners. For more information
on these options, see the DSM/SCM User’s Guide. (NonStop Software Essentials only supports
shared product groups and HP recommends using shared product groups for PI as well.)
The Enter CNFGINFO Process Name dialog box appears with the default name $ZPHC.
4. Click Next to accept the default.
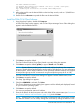
The Setup Type dialog box appears:
5. Check that WINSOCK is selected. Click Next.
The Choose Destination Location dialog box appears with the default path displayed, based
on your Windows operating system:
6. Click Next to accept the default.
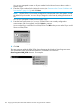
You are now prompted to enter an IP address:
7. Enter the IP address for the host system with which DSM/SCM communicates (see “Determine
the Current IP Address and Port Number” (page 161)), and click Next.
NOTE: If DSM/SCM is not currently configured to communicate with a host system, accept
the default IP address. You can always change this value later by editing the dsmscm.ini file.
Install the DSM/SCM Client From ZDSMSCM 163