
Changing the DHCP, DNS, or BOOTP Server from CLIMs to System Consoles


Preparing to Migrate BOOTP to System Consoles
This section applies only to NonStop systems running J-series software (except NonStop NS2000
series systems). These steps will ensure that you have the appropriate HSS firmware file configured
for each of those systems on the shared maintenance LAN (dedicated service LAN).
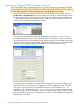
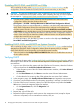
1. Check the HSS version currently running on the processor blades in each system. Use the
Update HSS or Copy HSS Files actions in the OSM Low-Level Link to compare the HSS version
on all processors in the system against each other and also against versions available in the
C:\HSS\T8004 directory on the system console. These actions are launched from the Tools
menu or, before system discovery, from the toolbar:
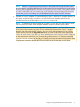
You should also check the latest NSC DVD for possible HSS updates. If a newer version is
available, download it to the C:\HSS\T8004 directory on the system console, as described
in the NonStop System Console Installer Guide. After this version is downloaded to the system
console, it will also appear in the Available HSS versions drop-down menu in the Update HSS
dialog box and can be selected during an Update HSS or Copy HSS Files action:
If a newer version is available, the Update HSS or Copy HSS Files actions also allow you to
update HSS files for the system you are logged on to. Both the Update HSS and Copy HSS
Files actions copy and rename the specified HSS file from C:\HSS\T8004\vproc id
\HPILDR.efi to C:\Images\NBsystem serial number.efi on the system console. Update
HSS also prompts you to reset all blades after the file copy/rename, whereas Copy HSS Files
does not. Repeat the process for each system on the LAN. For more information, see the OSM
Low-Level Link online help.
8 Changing the DHCP, DNS, or BOOTP Server from CLIMs to System Consoles