
Replacing a Front Group Service LED Cable Assembly


Replacing a Front Group Service LED Cable
Assembly
This procedure replaces a front group service LED cable assembly in a NonStop S-series
server online. The front group service LED is part of this cable assembly, so if that LED
fails, you must replace this entire cable assembly. You do not need to shut down the
system before replacing a front group service LED cable assembly.
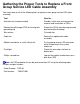
The following is a high-level summary of the tasks required to replace the assembly. Each
task in this outline is linked to step-by-step instructions about how to perform the task. After
you complete a task, click the check box.
1 Read the cautions.
2 Gather the proper tools.
3 Unpack and inspect the replacement cable assembly.
If the replacement cable assembly is damaged, you must order another
replacement cable assembly before continuing with this procedure.
4 Remove the disk drives from slots 04, 05, and 06 of the enclosure. Follow
Steps 1 through 3 of Replacing an Internal Mirrored Disk Drive CRU or
Replacing an Internal Nonmirrored Disk Drive CRU.
5 Remove the PMF CRU or IOMF CRU from slot 50 of the enclosure using the
appropriate OSM action or guided procedure. See Guided Procedures.
Follow the OSM action or guided procedure until you have removed the CRU.
Perform Steps 6 through 8 of this procedure and then reinstall the CRU and
resume the OSM action or guided procedure exactly where you left off.
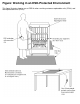
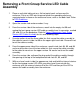
6 Remove the front group service LED cable assembly.
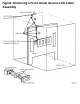
7 Install the front group service LED cable assembly.
8 Reinstall the disk drives in slots 04, 05, and 06 of the enclosure. Follow Steps
4 through 7 of Replacing an Internal Mirrored Disk Drive CRU or Replacing an
Internal Nonmirrored Disk Drive CRU.
9 Reinstall the PMF CRU or IOMF CRU in slot 50 of the enclosure by resuming
the OSM action or guided procedure exactly where you left off.