
Replacing a Front Group Service LED Cable Assembly

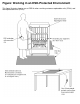


Installing a Front Group Service LED Cable
Assembly
1 With the appearance-side enclosure door open, continue to observe ESD
protection guidelines. Refer to ESD Guidelines.
2 Remove the external retainer from the LED on the cable assembly and, from
outside the appearance side of the enclosure, insert the external retainer into
the opening for the front group service LED. Refer to Figure: Installing a Front
Group Service LED Cable Assembly for this and following steps.
3 From inside the appearance side, insert the LED of the cable assembly into
the external retainer you just installed.
4 From inside the appearance side, push the internal retainer over the external
retainer and press both retainers together to secure the LED in its opening in
the enclosure.
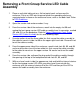
5 Thread the plug end of the cable assembly through the opening at the top of
the backplane behind slots 04, 05, and 06.
6 From the service side of the enclosure, plug the cable assembly into the
connector marked J34 and J16 on the backplane behind slot 50.
7 Use three cable ties to secure the cable assembly to the cable tie mounts
inside slot 50 on the upper right-hand side. Cut off any excess cable tie, being
careful not to cut the cable assembly.
8 From the appearance side of the enclosure, use two cable ties to secure the
cable assembly to the cable tie mounts on the upper surface of slots 04, 05,
and 06. Cut off any excess cable tie, being careful not to cut the cable
assembly.