
Replacing an ATM3SA CRU


Installing an ATM3SA CRU
Note: Whenever you handle an ATM ServerNet adapter (ATM3SA) CRU, you
should follow standard operating practices to avoid damage to the equipment.
1 Put on the electrostatic discharge (ESD) wriststrap and attach the
grounding clip to the antistatic mat.
2 Place the package containing the ATM3SA CRU on the antistatic mat.
3
Caution: When opening the packing container, be careful not to cut
into the ESD protective bag.
Open the packing container and remove the ATM3SA CRU.
4 Disconnect the grounding clip of your ESD wriststrap from the antistatic
mat and connect it to an exposed, unpainted metal surface on the
ATM3SA CRU.
5 Grasp the ATM3SA CRU by its ejector in one hand, support the bottom
edge of the ATM3SA CRU with the other hand, and carry the ATM3SA
CRU to the service side of the system enclosure and set it down.
Note: The ATM3SA CRU weights 6.75 pounds (3 kilograms).
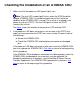
6 Disconnect the grounding clip of your ESD wriststrap from the ATM3SA
CRU and connect it to an exposed, unpainted, metal surface on the
service side of the system enclosure, such as the processor
multifunction (PMF) CRU or I/O multifunction (IOMF) CRU ventilation
holes.
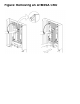
The figure shows how to connect the grounding clip to the ventilation
holes on the PMF CRU or IOMF CRU .
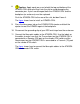
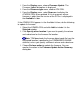
7 With the ejector on the ATM3SA CRU in the full-open position, grasp the
ATM3SA CRU by the ejector with one hand and support the bottom edge
of the ATM3SA CRU with the other hand. Hold the ATM3SA CRU so that
its ejector is at the top and insert the ATM3SA CRU into the upper part of
the carrier.