
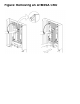
Replacing an ATM3SA CRU


8
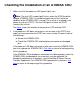
Caution: Apply equal pressure to both the top and bottom of the
ATM3SA CRU when pushing it into the slot to avoid damaging the
connector pins. If pins are damaged, both the ATM3SA CRU and the
backplane (or enclosure) must be replaced.
Push the ATM3SA CRU to the rear of the slot, but don't force it.
The figure shows how to install an ATM3SA CRU.
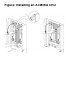
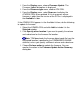
9 Press the blue-green tab on the ATM3SA CRU ejector and latch the
ejector to seat the ATM3SA against the backplane.
10 Disconnect the grounding clip of your ESD wriststrap from the enclosure.
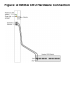
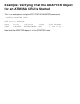
11 Connect the fiber optic cables to the ATM3SA CRU. Use the labels on
the cables to make sure that the Transmit port on the ATM3SA CRU is
connected to a Receive (RX) port on the vendor ATM switch and the
Receive port on the ATM3SA CRU is connected to a Transmit (TX) port
on the vendor ATM switch.
The figure shows how to connect the fiber optic cables to the ATM3SA
CRU and vendor ATM switch.